图像分类
概述
图像分类是计算机视觉中的基础任务,其核心是将一张图片归类到预设的类别中。这是人工智能领域的基石,使机器能够以类似人类的方式理解和解释视觉信息。
图像分类指的是根据图片的视觉内容,为整张图片分配一个标签或类别。这项任务在计算机视觉中至关重要,广泛应用于各行各业。图像分类的意义在于,它能够自动化完成原本需要人工干预的视觉理解任务。
真实场景中的应用
图像分类已经在众多实际应用中发挥了变革性作用,涵盖多个行业:
- 医疗健康:辅助医学影像分析,如识别 X 光片或核磁共振中的异常。
- 农业:通过航拍图像监测作物健康、检测植物病害。
- 汽车:为高级驾驶辅助系统和自动驾驶车辆识别交通标志、行人及其他车辆。
- 零售:驱动视觉搜索和自动化库存管理系统。
- 安防监控:提升威胁检测与人脸识别能力。
- 环境监测:分析卫星图像,用于森林砍伐、城市规划和气候变化研究。
在树莓派等边缘设备上运行分类的优势
在树莓派等边缘设备上实现图像分类,具有以下显著优势:
- 低延迟:本地处理图片,无需上传云端,极大降低响应时间。
- 离线运行:无需网络连接即可完成分类,适用于偏远或网络不稳定环境。
- 隐私安全:敏感图片数据留在本地,满足数据隐私和合规要求。
- 成本效益:无需昂贵的云计算资源,适合持续或高频分类任务。
- 可扩展性:支持分布式架构,多台设备可独立或协同工作。
- 能效高:优化模型配合专用硬件,比云端方案更节能,适合电池供电或远程场景。
- 易于定制:便于部署专用或频繁更新的模型,满足特定业务需求。
通过在树莓派等边缘设备上进行图像分类,我们可以打造响应更快、更安全、更高效的计算机视觉解决方案,为各类应用和环境带来智能视觉处理的新可能。
接下来,我们将深入讲解如何在树莓派上实现和优化图像分类,充分发挥边缘计算的优势,构建高效强大的视觉系统。
环境搭建
更新树莓派系统
首先,确保树莓派系统为最新状态:
sudo apt update
sudo apt upgrade -y
安装所需库
安装图像处理和机器学习相关依赖:
sudo apt install python3-pip
sudo rm /usr/lib/python3.11/EXTERNALLY-MANAGED
pip3 install --upgrade pip
创建虚拟环境(推荐)
建议使用虚拟环境管理依赖:
python3 -m venv ~/tflite
source ~/tflite/bin/activate
安装 TensorFlow Lite
我们关注的是推理,即在设备上运行 TensorFlow Lite 模型进行预测。推理需通过解释器执行,TensorFlow Lite 解释器专为轻量和高效设计,采用静态图和自定义内存分配器,确保加载、初始化和执行延迟最小。
推荐使用 TensorFlow Lite runtime ,这是专为移动和嵌入式设备优化的简化库,无需完整 TensorFlow 包。
pip install tflite_runtime --no-deps
安装的 wheel 文件:
tflite_runtime-2.14.0-cp311-cp311-manylinux_2_34_aarch64.whl
安装其他 Python 库
安装图像分类所需的 Python 库:
如已安装其他版本 Numpy,先卸载:
pip3 uninstall numpy
安装与 tflite_runtime 兼容的 1.23.2 版本:
pip3 install numpy==1.23.2
pip3 install Pillow matplotlib
创建工作目录
若在 Raspi-Zero 最小系统(无桌面)下,可能没有预设目录树(可用 ls 检查),可手动创建:
mkdir Documents
cd Documents/
mkdir TFLITE
cd TFLITE/
mkdir IMG_CLASS
cd IMG_CLASS
mkdir models
cd models
在 Raspi-5 上,/Documents 目录通常已存在。
获取预训练图像分类模型:
在资源有限的设备上,合适的预训练模型至关重要。MobileNet 专为移动和嵌入式视觉应用设计,兼顾精度与速度。常用版本有 MobileNetV1、V2、V3。这里下载 V2:
# 一行命令,使用反斜杠换行
wget https://storage.googleapis.com/download.tensorflow.org/\
models/tflite_11_05_08/mobilenet_v2_1.0_224_quant.tgz

tar xzf mobilenet_v2_1.0_224_quant.tgz
获取 标签文件 :
# 一行命令,使用反斜杠换行
wget https://github.com/Mjrovai/EdgeML-with-Raspberry-Pi/blob/\
main/IMG_CLASS/models/labels.txt
最终,模型目录结构如下:
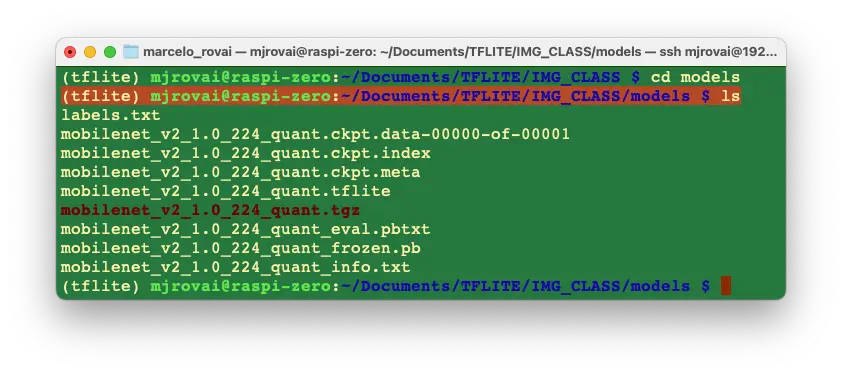
实际只需
mobilenet_v2_1.0_224_quant.tflite和labels.txt,其余文件可删除。
配置 Jupyter Notebook(可选)
如需使用 Jupyter Notebook 进行开发:
pip3 install jupyter
jupyter notebook --generate-config
启动 Jupyter Notebook(请替换为你的 IP 地址):
jupyter notebook --ip=192.168.4.210 --no-browser
终端会显示本地 URL,可在浏览器中打开 notebook:
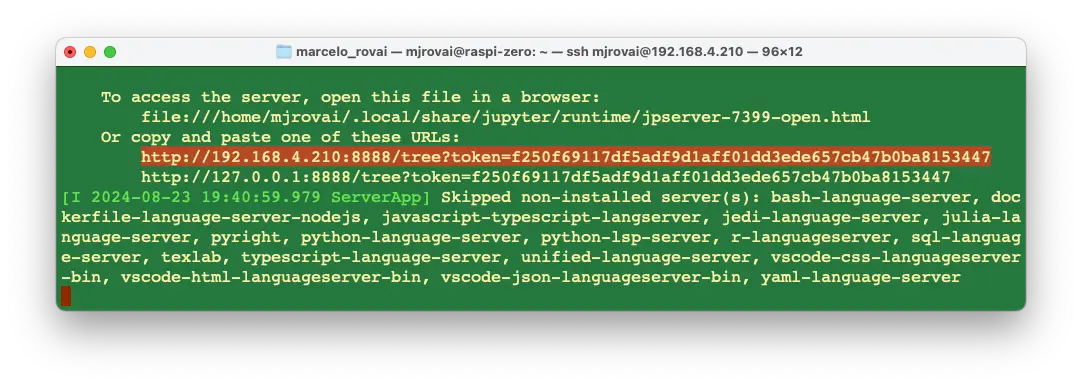
可在其他设备浏览器中输入树莓派 IP 和 token 访问:
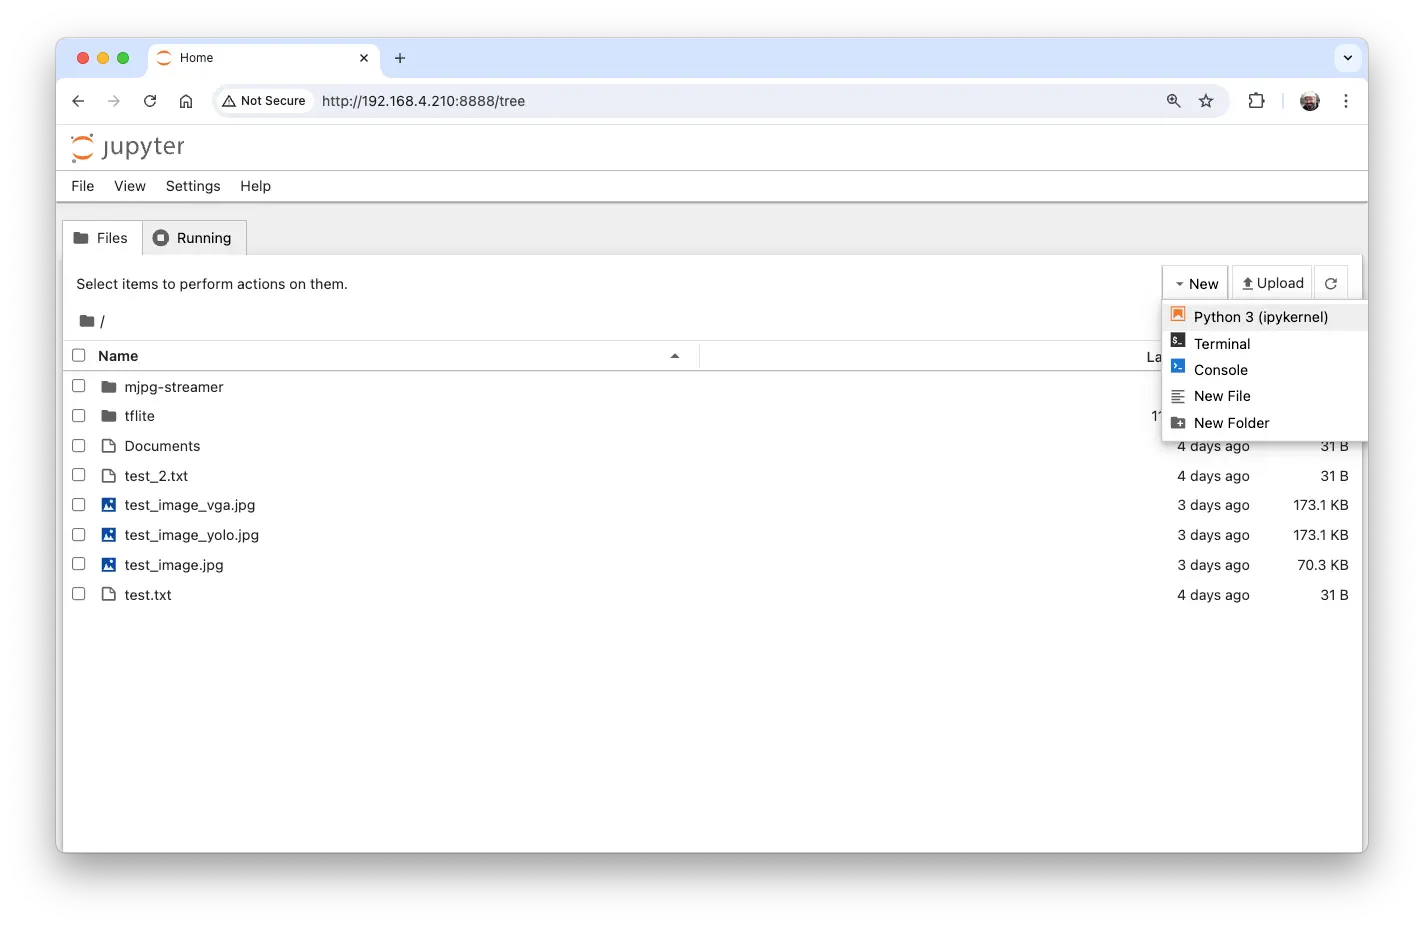
在树莓派上指定工作目录,新建 Python 3 notebook。
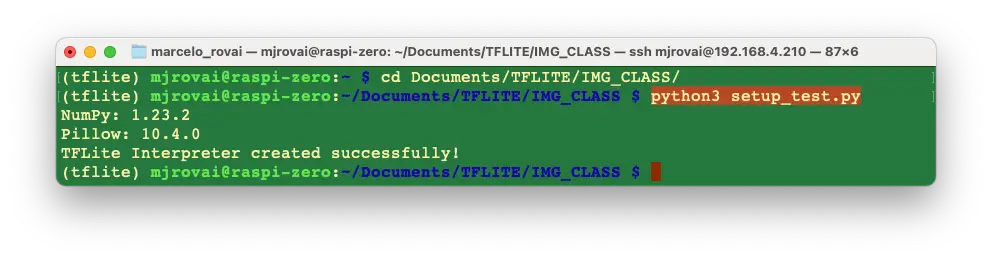
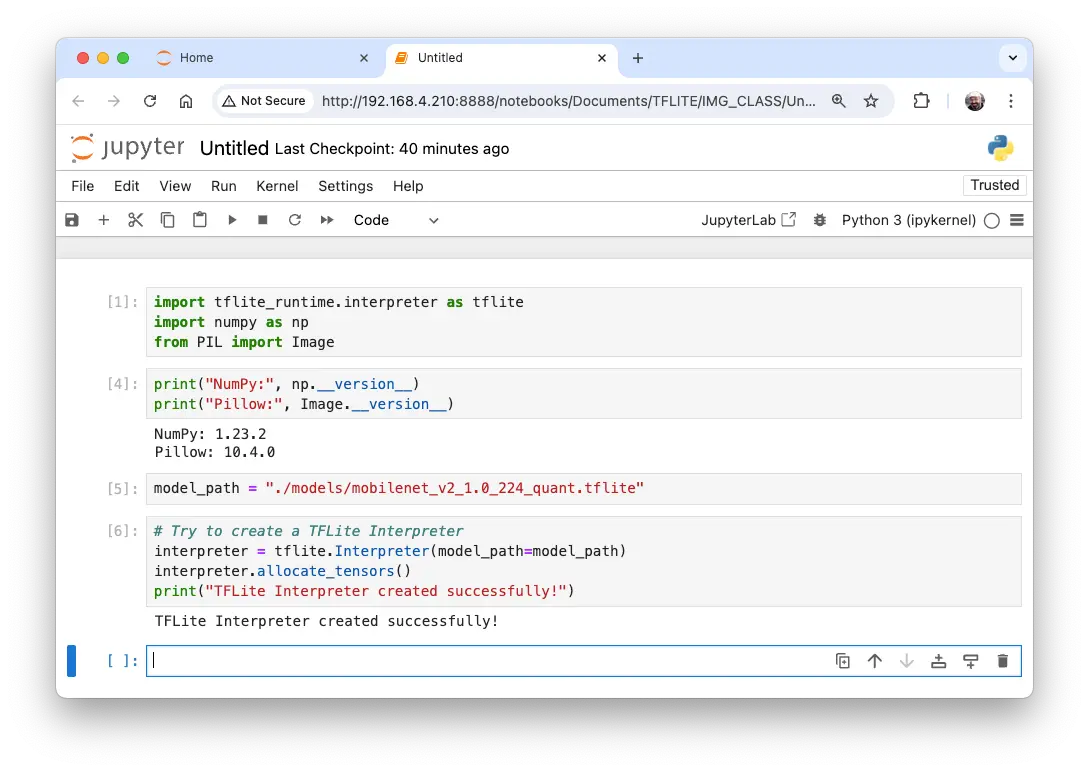
验证环境
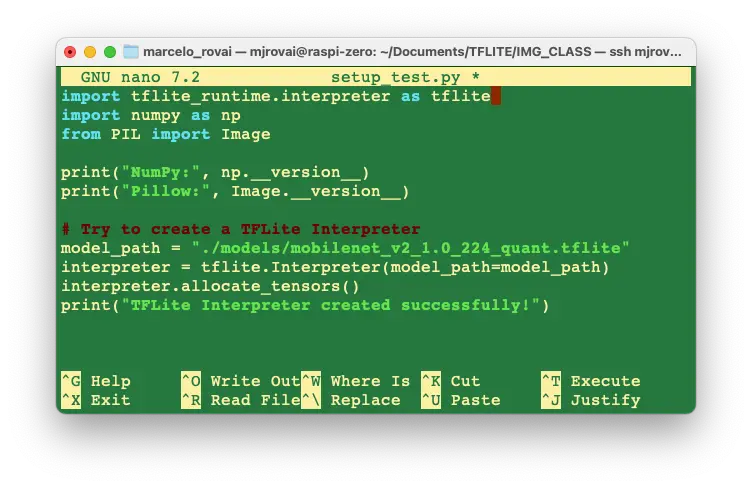
运行简单 Python 脚本测试环境:
import tflite_runtime.interpreter as tflite
import numpy as np
from PIL import Image

print("NumPy:", np.__version__)
print("Pillow:", Image.__version__)

# 尝试创建 TFLite 解释器
model_path = "./models/mobilenet_v2_1.0_224_quant.tflite"
interpreter = tflite.Interpreter(model_path=model_path)
interpreter.allocate_tensors()
print("TFLite Interpreter created successfully!")
可用 nano 编辑器保存脚本,CTRL+O 保存,ENTER 确认,CTRL+X 退出。
运行脚本:
也可直接在 Notebook 运行:
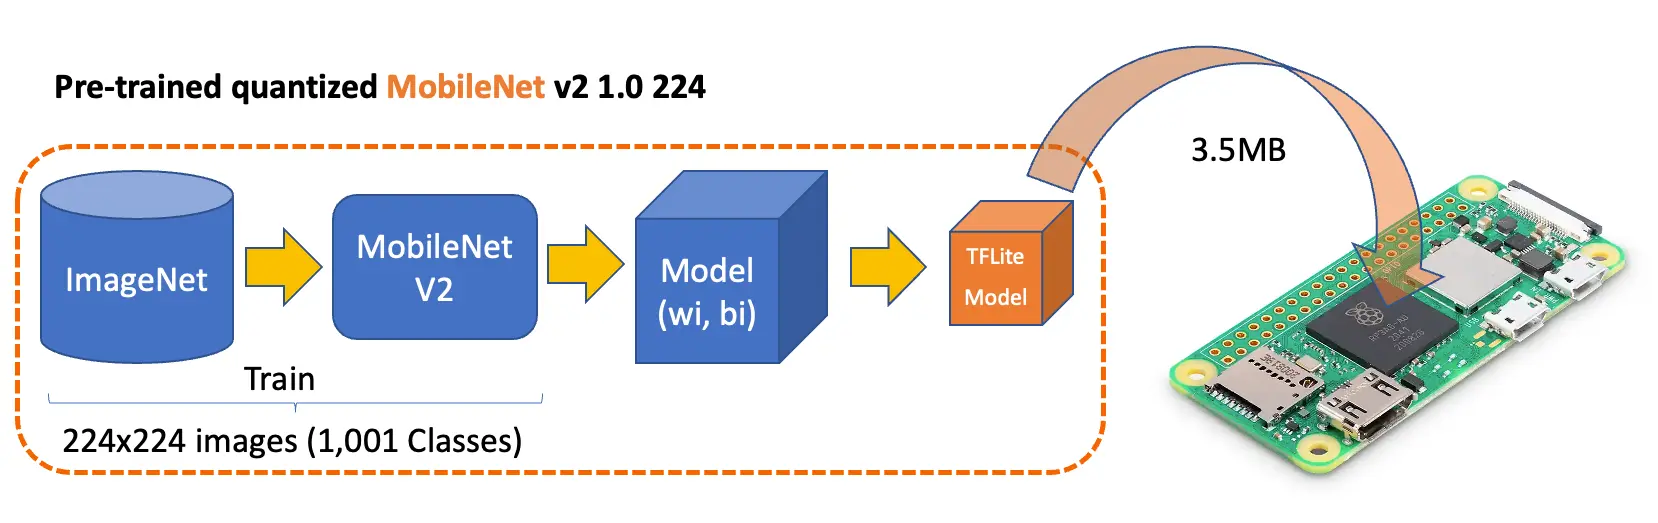
使用 Mobilenet V2 进行推理
上一节已完成环境搭建,并下载了流行的预训练模型 Mobilenet V2。该模型基于 ImageNet 数据集($224\times 224$,共 120 万张图片,1001 类),转换为仅 3.5MB 的 TensorFlow Lite 格式,非常适合树莓派的存储和内存限制。
新建 notebook ,按步骤进行图片分类:
导入所需库:
import time
import numpy as np
import matplotlib.pyplot as plt
from PIL import Image
import tflite_runtime.interpreter as tflite
加载 TFLite 模型并分配张量:
model_path = "./models/mobilenet_v2_1.0_224_quant.tflite"
interpreter = tflite.Interpreter(model_path=model_path)
interpreter.allocate_tensors()
获取输入输出张量信息:
input_details = interpreter.get_input_details()
output_details = interpreter.get_output_details()
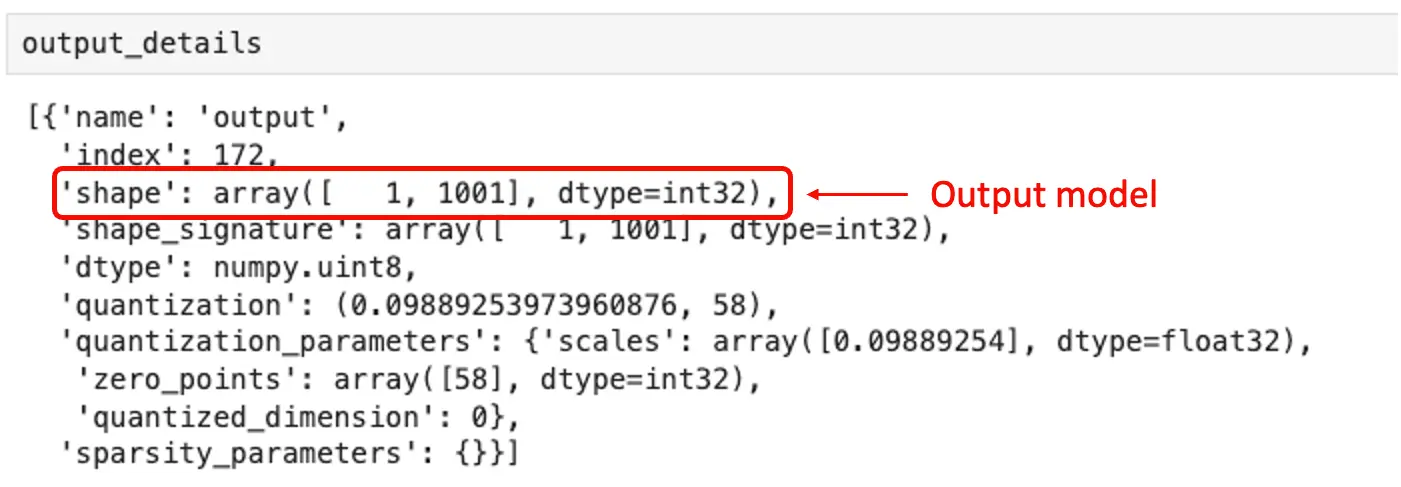
输入张量信息显示,模型输入为 (1, 224, 224, 3),即每次输入一张 $224\times 224\times 3$ 的图片。
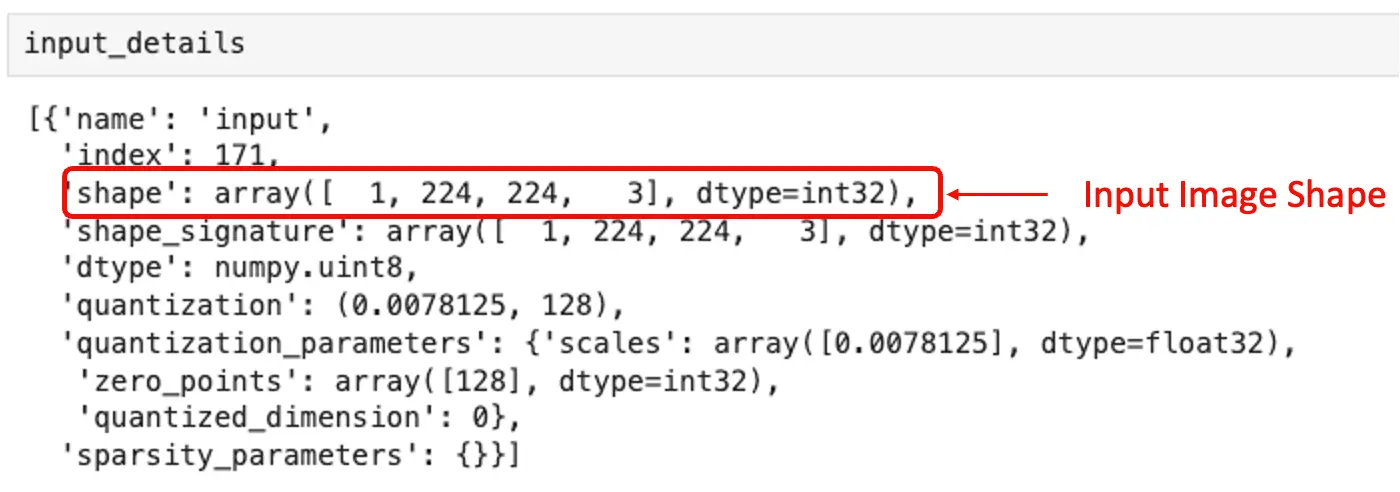
输出张量信息显示,推理结果为 1001 个整数值的数组,每个值对应一个类别的概率。
检查模型输入数据类型:
input_dtype = input_details[0]["dtype"]
input_dtype
dtype('uint8')
说明输入图片应为原始像素(0-255)。
获取测试图片,可从电脑传输或直接下载。先创建图片目录:
mkdir images
cd images
wget https://upload.wikimedia.org/wikipedia/commons/3/3a/Cat03.jpg
加载并显示图片:
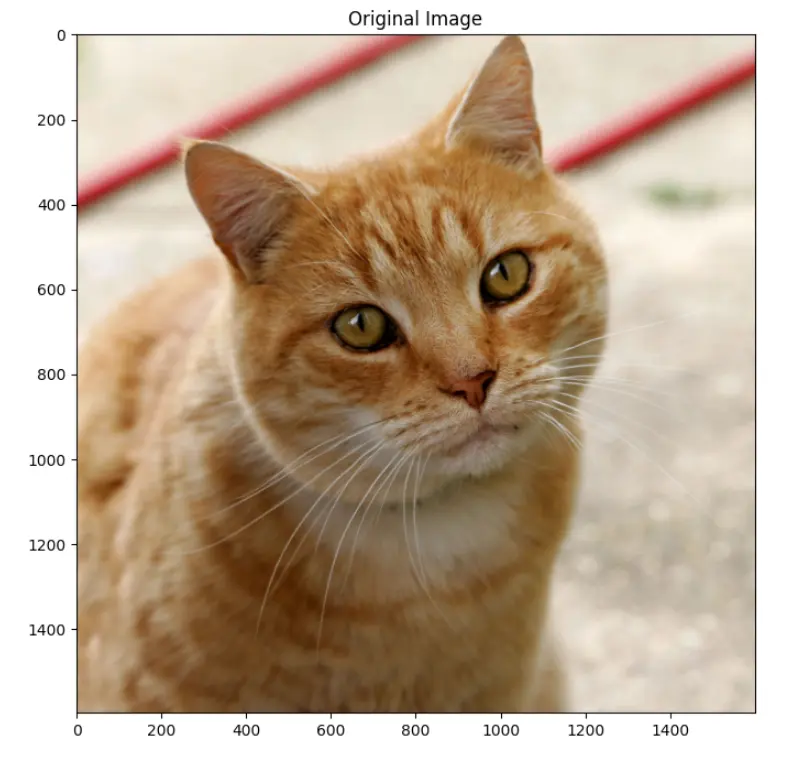
# 加载图片
img_path = "./images/Cat03.jpg"
img = Image.open(img_path)

# 显示图片
plt.figure(figsize=(8, 8))
plt.imshow(img)
plt.title("原始图片")
plt.show()
查看图片尺寸:
width, height = img.size
图片为 RGB,宽高均为 1600。需调整为 (224, 224, 3),并增加 batch 维度,符合模型输入要求 (1, 224, 224, 3)。推理输出为 1001 维数组:
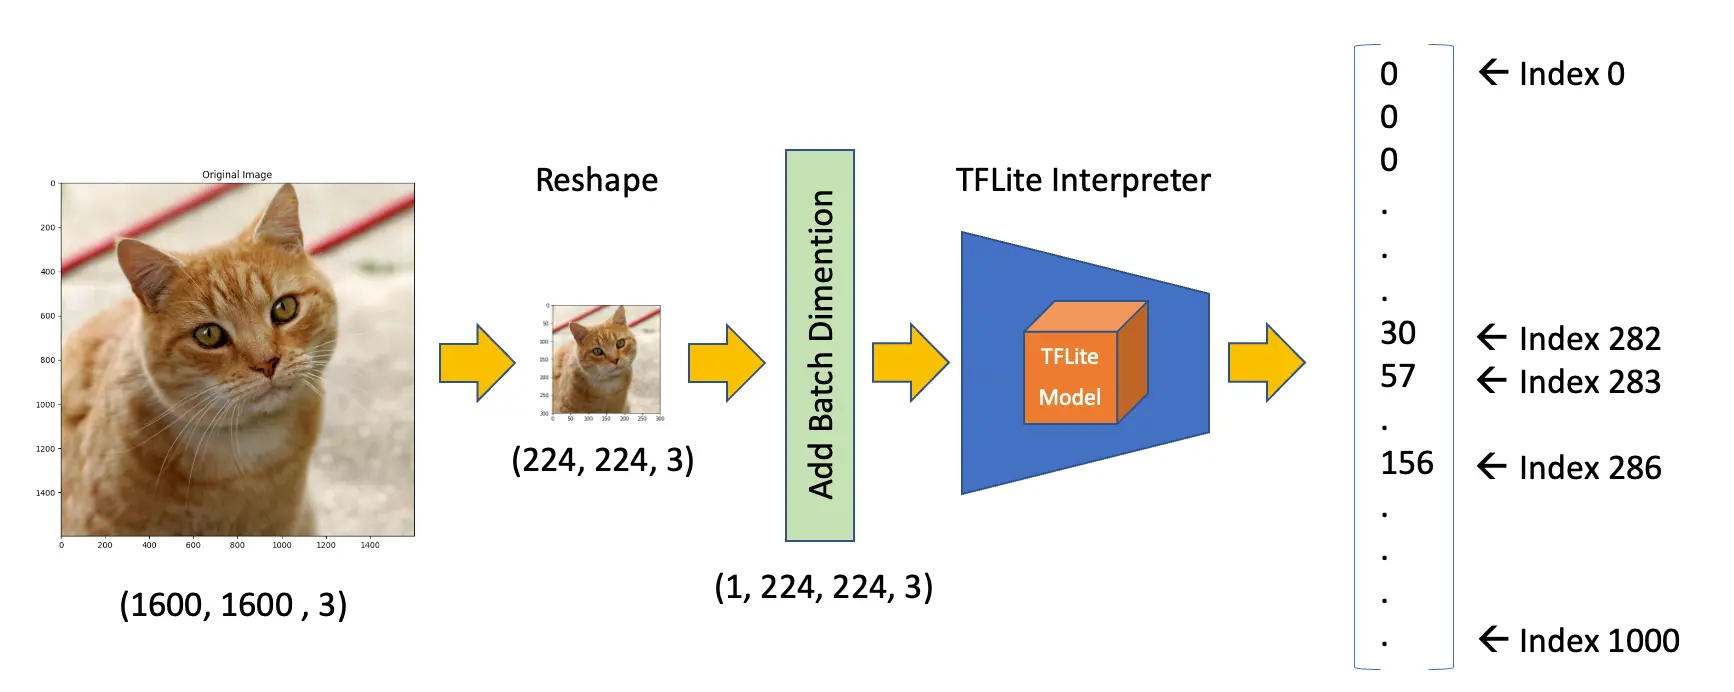
调整图片尺寸并添加 batch 维度:
img = img.resize(
    (input_details[0]["shape"][1], input_details[0]["shape"][2])
)
input_data = np.expand_dims(img, axis=0)
input_data.shape
确认输入数据类型:
input_data.dtype
dtype('uint8')
与模型要求一致。
使用 input_data 进行推理并获取预测结果:
interpreter.set_tensor(input_details[0]["index"], input_data)
interpreter.invoke()
predictions = interpreter.get_tensor(output_details[0]["index"])[0]
预测结果为 1001 维数组。获取概率最高的前 5 个类别索引:
top_k_results = 5
top_k_indices = np.argsort(predictions)[::-1][:top_k_results]
top_k_indices
top_k_indices 结果如 array([283, 286, 282]),即最可能的类别索引。需根据标签文件查找对应类别:
def load_labels(filename):
    with open(filename, "r") as f:
        return [line.strip() for line in f.readlines()]
打印对应标签:
labels_path = "./models/labels.txt"
labels = load_labels(labels_path)

print(labels[286])
print(labels[283])
print(labels[282])
print(labels[288])
print(labels[479])
输出:
Egyptian cat
tiger cat
tabby
lynx
carton
前四个类别均为猫科动物。prediction 内容为每个标签的概率,需反量化并 softmax:
scale, zero_point = output_details[0]["quantization"]
dequantized_output = (
    predictions.astype(np.float32) - zero_point
) * scale
exp_output = np.exp(dequantized_output - np.max(dequantized_output))
probabilities = exp_output / np.sum(exp_output)
打印前五个概率:
print(probabilities[286])
print(probabilities[283])
print(probabilities[282])
print(probabilities[288])
print(probabilities[479])
0.27741462
0.3732285
0.16919471
0.10319158
0.023410844
定义函数关联标签与概率:
for i in range(top_k_results):
    print(
        "\t{:20}: {}%".format(
            labels[top_k_indices[i]],
            (int(probabilities[top_k_indices[i]] * 100)),
        )
    )
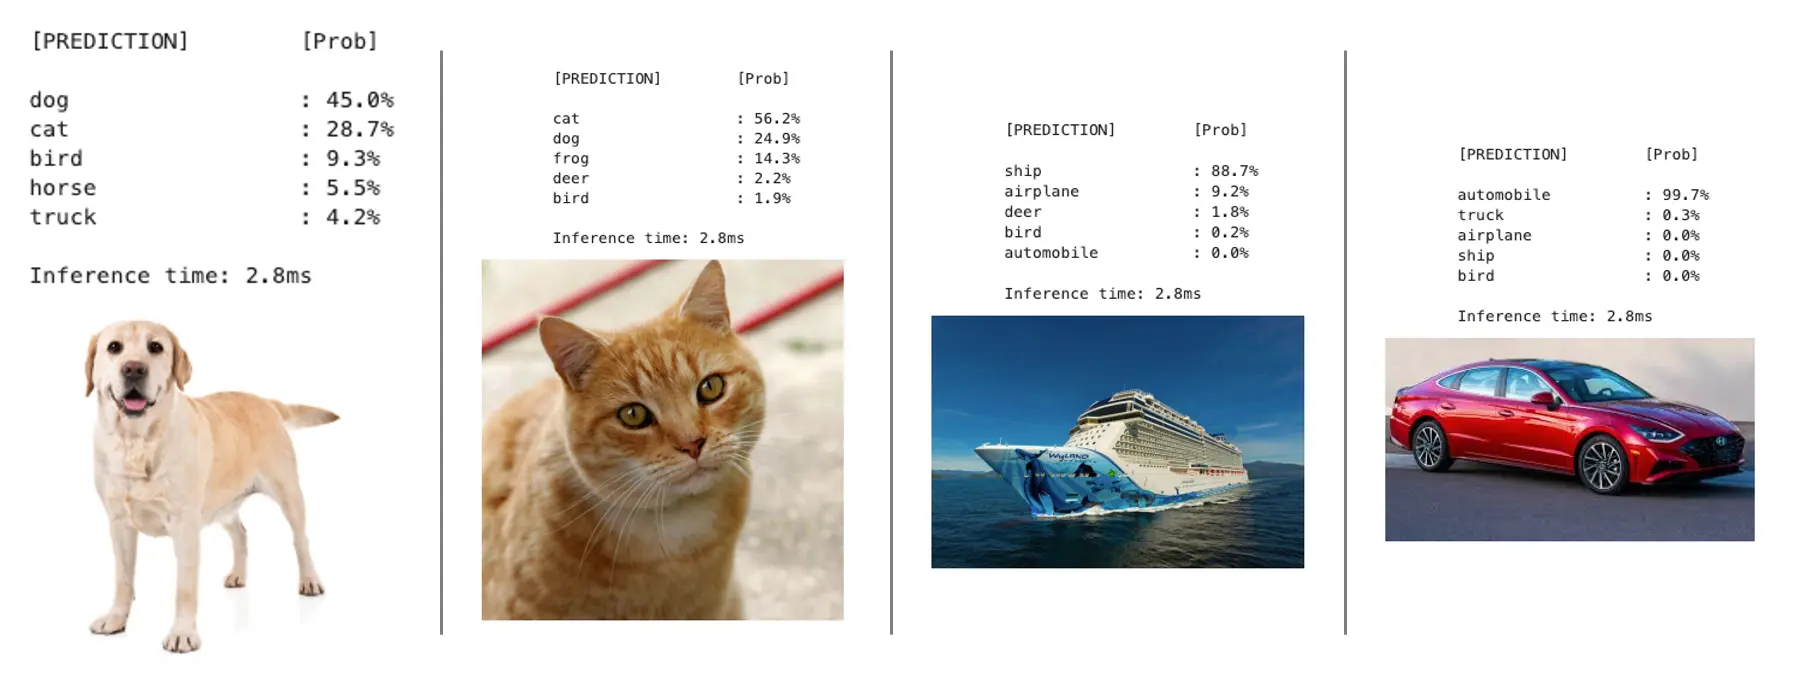
tiger cat           : 37%
Egyptian cat        : 27%
tabby               : 16%
lynx                : 10%
carton              : 2%
通用图像分类函数
定义通用函数,输入图片路径,输出 Top-5 预测类别:
def image_classification(
    img_path, model_path, labels, top_k_results=5
):
    # load the image
    img = Image.open(img_path)
    plt.figure(figsize=(4, 4))
    plt.imshow(img)
    plt.axis("off")

    # Load the TFLite model
    interpreter = tflite.Interpreter(model_path=model_path)
    interpreter.allocate_tensors()

    # Get input and output tensors
    input_details = interpreter.get_input_details()
    output_details = interpreter.get_output_details()

    # Preprocess
    img = img.resize(
        (input_details[0]["shape"][1], input_details[0]["shape"][2])
    )
    input_data = np.expand_dims(img, axis=0)

    # Inference on Raspi-Zero
    interpreter.set_tensor(input_details[0]["index"], input_data)
    interpreter.invoke()

    # Obtain results and map them to the classes
    predictions = interpreter.get_tensor(output_details[0]["index"])[
        0
    ]

    # Get indices of the top k results
    top_k_indices = np.argsort(predictions)[::-1][:top_k_results]

    # Get quantization parameters
    scale, zero_point = output_details[0]["quantization"]

    # Dequantize the output and apply softmax
    dequantized_output = (
        predictions.astype(np.float32) - zero_point
    ) * scale
    exp_output = np.exp(
        dequantized_output - np.max(dequantized_output)
    )
    probabilities = exp_output / np.sum(exp_output)

    print("\n\t[PREDICTION]        [Prob]\n")
    for i in range(top_k_results):
        print(
            "\t{:20}: {}%".format(
                labels[top_k_indices[i]],
                (int(probabilities[top_k_indices[i]] * 100)),
            )
        )

测试自训练模型
可参考 CIFAR-10 分类 Notebook 训练模型。CIFAR10 数据集包含 10 类共 6 万张 $32\times 32$ 彩色图片,模型转换后仅 674MB。

在 Cifar 10 - Raspi 推理 Notebook 上可复现流程,效果如下:
安装 Picamera2
Picamera2 是树莓派官方维护的摄像头 Python 库,基于 libcamera,支持所有树莓派型号。系统已预装,但需在虚拟环境中可用。
激活虚拟环境:
source ~/tflite/bin/activate创建 .pth 文件,将系统 site-packages 路径加入虚拟环境:
echo "/usr/lib/python3/dist-packages" > \
 $VIRTUAL_ENV/lib/python3.11/site-packages/system_site_packages.pth
若 Python 版本不同,请替换
python3.11。测试导入 picamera2:
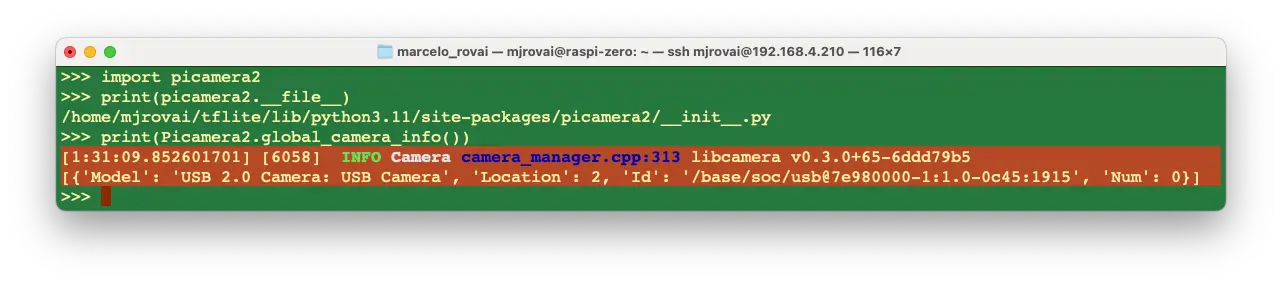
python3
>>> import picamera2
>>> print(picamera2.__file__)
输出如下,说明库可用:
/home/mjrovai/tflite/lib/python3.11/site-packages/picamera2/__init__.py
列出系统可用摄像头:
>>> print(Picamera2.global_camera_info())
如有 USB 摄像头,输出如下:
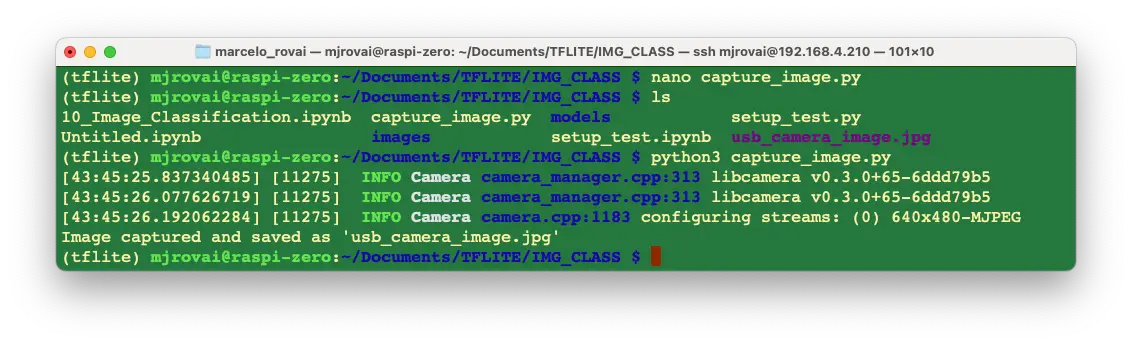
测试拍照脚本:
from picamera2 import Picamera2
import time

# Initialize the camera
picam2 = Picamera2()  # default is index 0

# Configure the camera
config = picam2.create_still_configuration(main={"size": (640, 480)})
picam2.configure(config)

# Start the camera
picam2.start()

# Wait for the camera to warm up
time.sleep(2)

# Capture an image
picam2.capture_file("usb_camera_image.jpg")
print("Image captured and saved as 'usb_camera_image.jpg'")

# Stop the camera
picam2.stop()
保存为 capture_image.py 并运行,图片将保存在当前目录。
可在电脑或树莓派上查看图片:
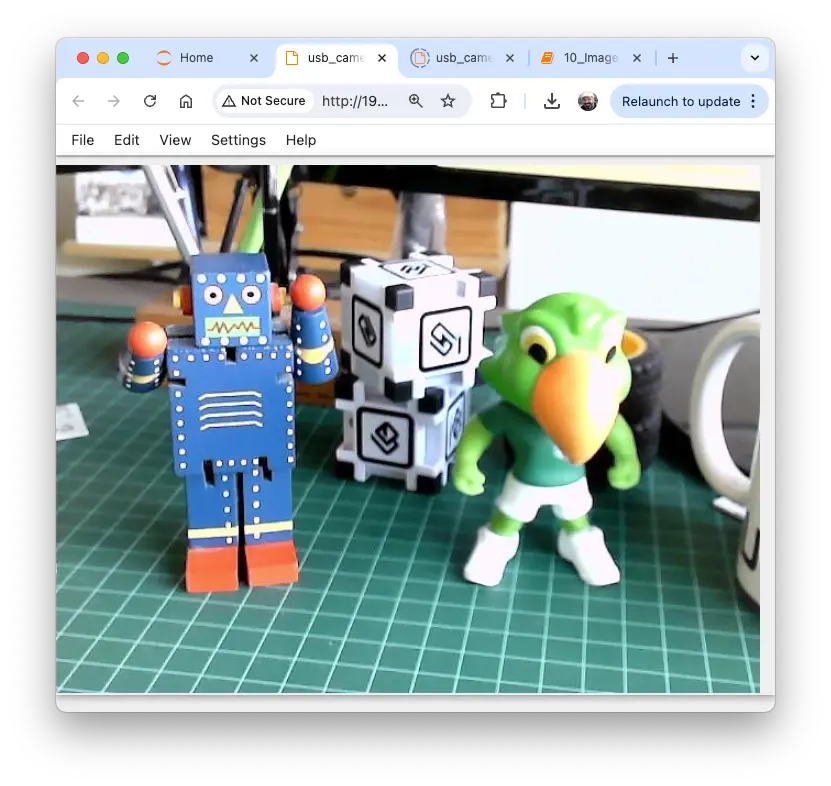
若使用 Raspi-5 桌面版,可直接在设备上打开图片。
图像分类项目实战
接下来,我们将基于 Edge Impulse 完成完整的图像分类项目。训练好的 TFLite 模型将在树莓派上推理。
项目目标
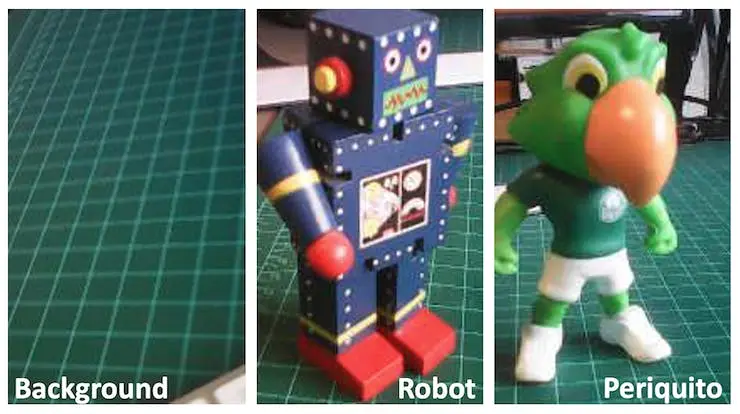
首先明确目标:检测并分类图片中的两种特定物体(如机器人和巴西鹦鹉玩具),并采集无目标物体的背景图片。
数据采集
明确目标后,最关键的步骤是采集数据集。可用手机拍照,但本例用树莓派采集。搭建简易 Web 服务器,实时预览并采集 QVGA (320x240) 图片。
安装 Flask:
pip3 install flask新建
get_img_data.py,集成摄像头采集与 Web 服务:
from flask import Flask, Response, render_template_string,
                  request, redirect, url_for
from picamera2 import Picamera2
import io
import threading
import time
import os
import signal

app = Flask(__name__)

# Global variables
base_dir = "dataset"
picam2 = None
frame = None
frame_lock = threading.Lock()
capture_counts = {}
current_label = None
shutdown_event = threading.Event()

def initialize_camera():
    global picam2
    picam2 = Picamera2()
    config = picam2.create_preview_configuration(
             main={"size": (320, 240)}
    )
    picam2.configure(config)
    picam2.start()
    time.sleep(2)  # Wait for camera to warm up

def get_frame():
    global frame
    while not shutdown_event.is_set():
        stream = io.BytesIO()
        picam2.capture_file(stream, format='jpeg')
        with frame_lock:
            frame = stream.getvalue()
        time.sleep(0.1)  # Adjust as needed for smooth preview

def generate_frames():
    while not shutdown_event.is_set():
        with frame_lock:
            if frame is not None:
                yield (b'--frame\r\n'
                       b'Content-Type: image/jpeg\r\n\r\n' +
                                       frame + b'\r\n')
        time.sleep(0.1)  # Adjust as needed for smooth streaming

def shutdown_server():
    shutdown_event.set()
    if picam2:
        picam2.stop()
    # Give some time for other threads to finish
    time.sleep(2)
    # Send SIGINT to the main process
    os.kill(os.getpid(), signal.SIGINT)

@app.route('/', methods=['GET', 'POST'])
def index():
    global current_label
    if request.method == 'POST':
        current_label = request.form['label']
        if current_label not in capture_counts:
            capture_counts[current_label] = 0
        os.makedirs(os.path.join(base_dir, current_label),
                                 exist_ok=True)
        return redirect(url_for('capture_page'))
    return render_template_string('''
        <!DOCTYPE html>
        <html>
        <head>
            <title>Dataset Capture - Label Entry</title>
        </head>
        <body>
            <h1>输入数据集标签</h1>
            <form method="post">
                <input type="text" name="label" required>
                <input type="submit" value="开始采集">
            </form>
        </body>
        </html>
    ''')

@app.route('/capture')
def capture_page():
    return render_template_string('''
        <!DOCTYPE html>
        <html>
        <head>
            <title>数据集采集</title>
            <script>
                var shutdownInitiated = false;
                function checkShutdown() {
                    if (!shutdownInitiated) {
                        fetch('/check_shutdown')
                            .then(response => response.json())
                            .then(data => {
                                if (data.shutdown) {
                                    shutdownInitiated = true;
                                    document.getElementById(
                                          'video-feed').src = '';
                                    document.getElementById(
                                          'shutdown-message')
                                    .style.display = 'block';
                                }
                            });
                    }
                }
                setInterval(checkShutdown, 1000); // 每秒检查一次
            </script>
        </head>
        <body>
            <h1>数据集采集</h1>
            <p>当前标签:{{ label }}</p>
            <p>已采集图片数量:{{ capture_count }}</p>
            <img id="video-feed" src="{{ url_for('video_feed') }}"
            width="640" height="480" />
            <div id="shutdown-message" style="display: none;
                                              color: red;">
                采集过程已停止。
                您可以关闭此窗口。
            </div>
            <form action="/capture_image" method="post">
                <input type="submit" value="采集图片">
            </form>
            <form action="/stop" method="post">
                <input type="submit" value="停止采集"
                style="background-color: #ff6666;">
            </form>
            <form action="/" method="get">
                <input type="submit" value="更换标签"
                style="background-color: #ffff66;">
            </form>
        </body>
        </html>
    ''', label=current_label, capture_count=capture_counts.get(
                                            current_label, 0))

@app.route('/video_feed')
def video_feed():
    return Response(generate_frames(),
                    mimetype='multipart/x-mixed-replace;
                    boundary=frame')

@app.route('/capture_image', methods=['POST'])
def capture_image():
    global capture_counts
    if current_label and not shutdown_event.is_set():
        capture_counts[current_label] += 1
        timestamp = time.strftime("%Y%m%d-%H%M%S")
        filename = f"image_{timestamp}.jpg"
        full_path = os.path.join(base_dir, current_label,
                                 filename)

        picam2.capture_file(full_path)

    return redirect(url_for('capture_page'))

@app.route('/stop', methods=['POST'])
def stop():
    summary = render_template_string('''
        <!DOCTYPE html>
        <html>
        <head>
            <title>数据集采集 - 已停止</title>
        </head>
        <body>
            <h1>数据集采集已停止</h1>
            <p>采集过程已停止。
               您可以关闭此窗口。</p>
            <p>采集总结:</p>
            <ul>
            {% for label, count in capture_counts.items() %}
                <li>{{ label }}: {{ count }} 张图片</li>
            {% endfor %}
            </ul>
        </body>
        </html>
    ''', capture_counts=capture_counts)

    # 启动新线程关闭服务器
    threading.Thread(target=shutdown_server).start()

    return summary

@app.route('/check_shutdown')
def check_shutdown():
    return {'shutdown': shutdown_event.is_set()}

if __name__ == '__main__':
    initialize_camera()
    threading.Thread(target=get_frame, daemon=True).start()
    app.run(host='0.0.0.0', port=5000, threaded=True)
在终端运行:
python3 get_img_data.py
访问 Web 界面:
- 树莓派本机(有桌面):浏览器访问
http://localhost:5000 - 局域网其他设备:浏览器访问
http://<raspberry_pi_ip>:5000(替换为树莓派 IP 地址)
该脚本实现了基于 Web 的图像采集与标注,适合机器学习项目数据集构建。
主要特性
- Web 界面:局域网任意设备可访问。
- 实时预览:摄像头画面实时显示。
- 标签系统:支持输入不同类别标签。
- 有序存储:图片按标签自动归类。
- 计数统计:每类图片数量实时统计。
- 采集总结:停止采集后显示统计信息。
主要组件
- Flask Web 应用
- Picamera2 摄像头控制
- 多线程帧采集
- 文件管理与归类
关键函数
initialize_camera():初始化摄像头get_frame():持续采集帧generate_frames():生成视频流shutdown_server():关闭服务index():标签输入页capture_page():主采集界面video_feed():实时预览capture_image():保存图片stop():停止采集并显示总结
使用流程
启动脚本
浏览器访问 Web 界面
输入标签,点击“开始采集”
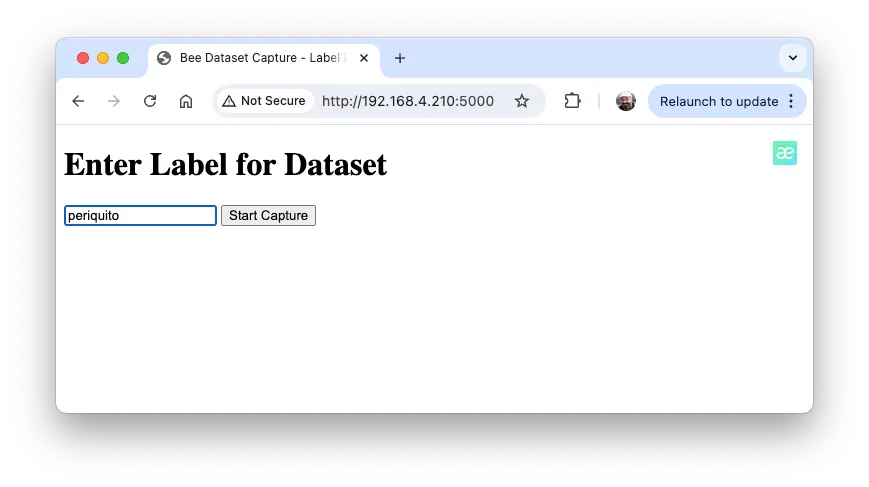
图 19: 输入标签界面 实时预览,调整画面
点击“采集图片”保存当前标签图片
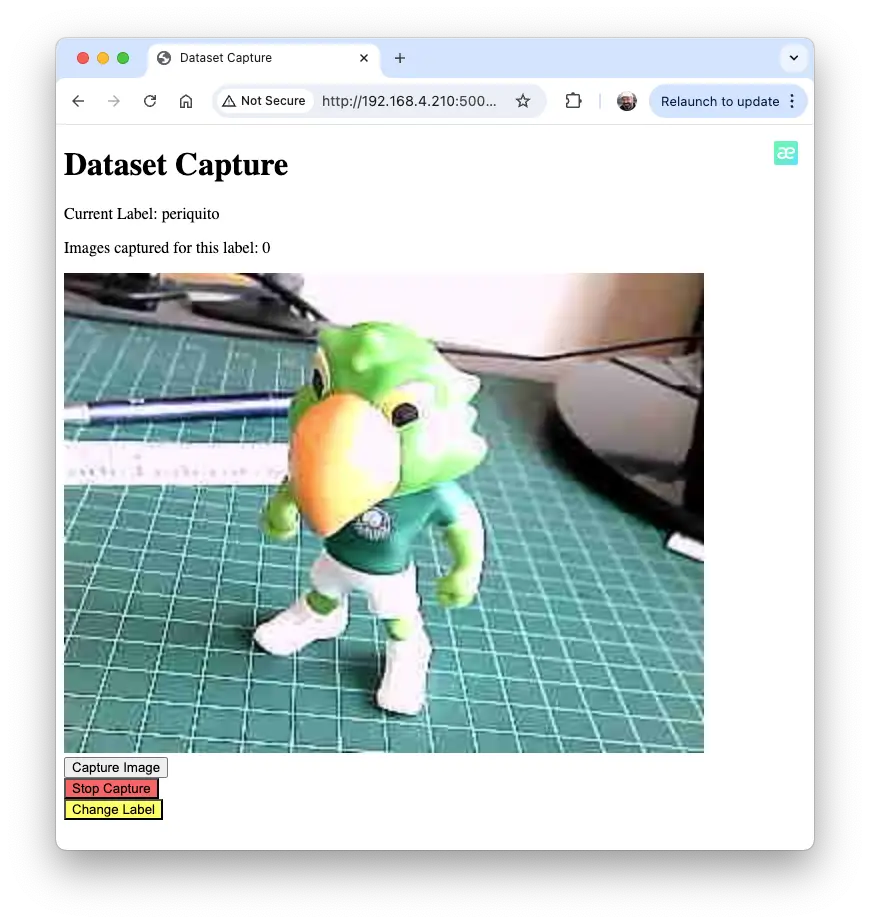
图 20: 采集界面 可切换标签采集不同类别,点击“更换标签”
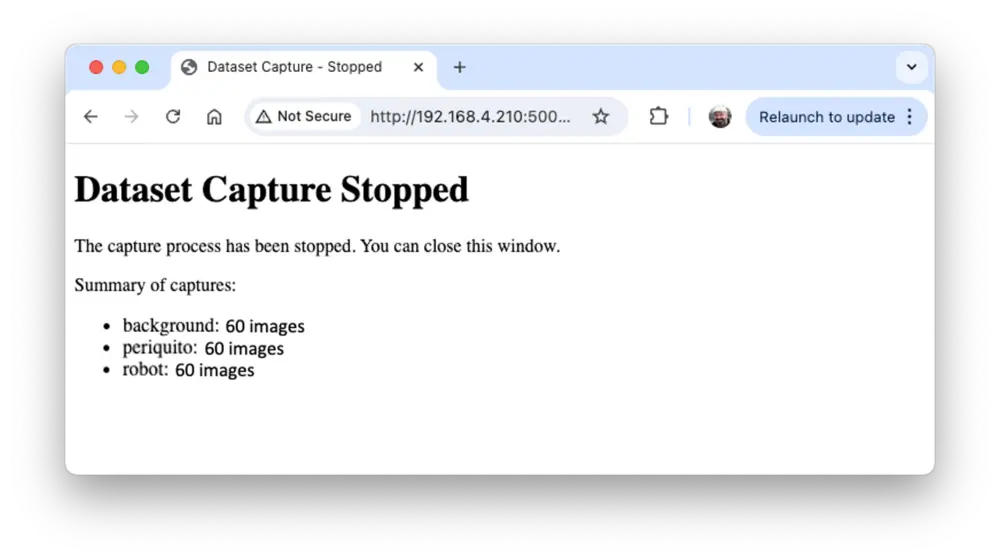
采集完成点击“停止采集”,查看总结
技术说明
- 多线程保证预览与 Web 服务流畅
- 图片按时间戳命名,避免重复
- Web 界面响应式,支持移动端
可定制项
- 调整采集分辨率(如 QVGA 320x240)
- 修改 HTML 模板风格
- 在
capture_image()增加图像处理逻辑
数据集样本量
每类采集约 60 张图片(如 periquito、robot、background),尽量涵盖不同角度、背景和光照。最终数据集结构如下:
dataset/
├── periquito/
├── robot/
└── background/
可用 Filezilla 将数据集传至主机。
Edge Impulse Studio 训练模型
使用 Edge Impulse Studio 训练模型。访问 Edge Impulse 官网 ,登录并新建项目:
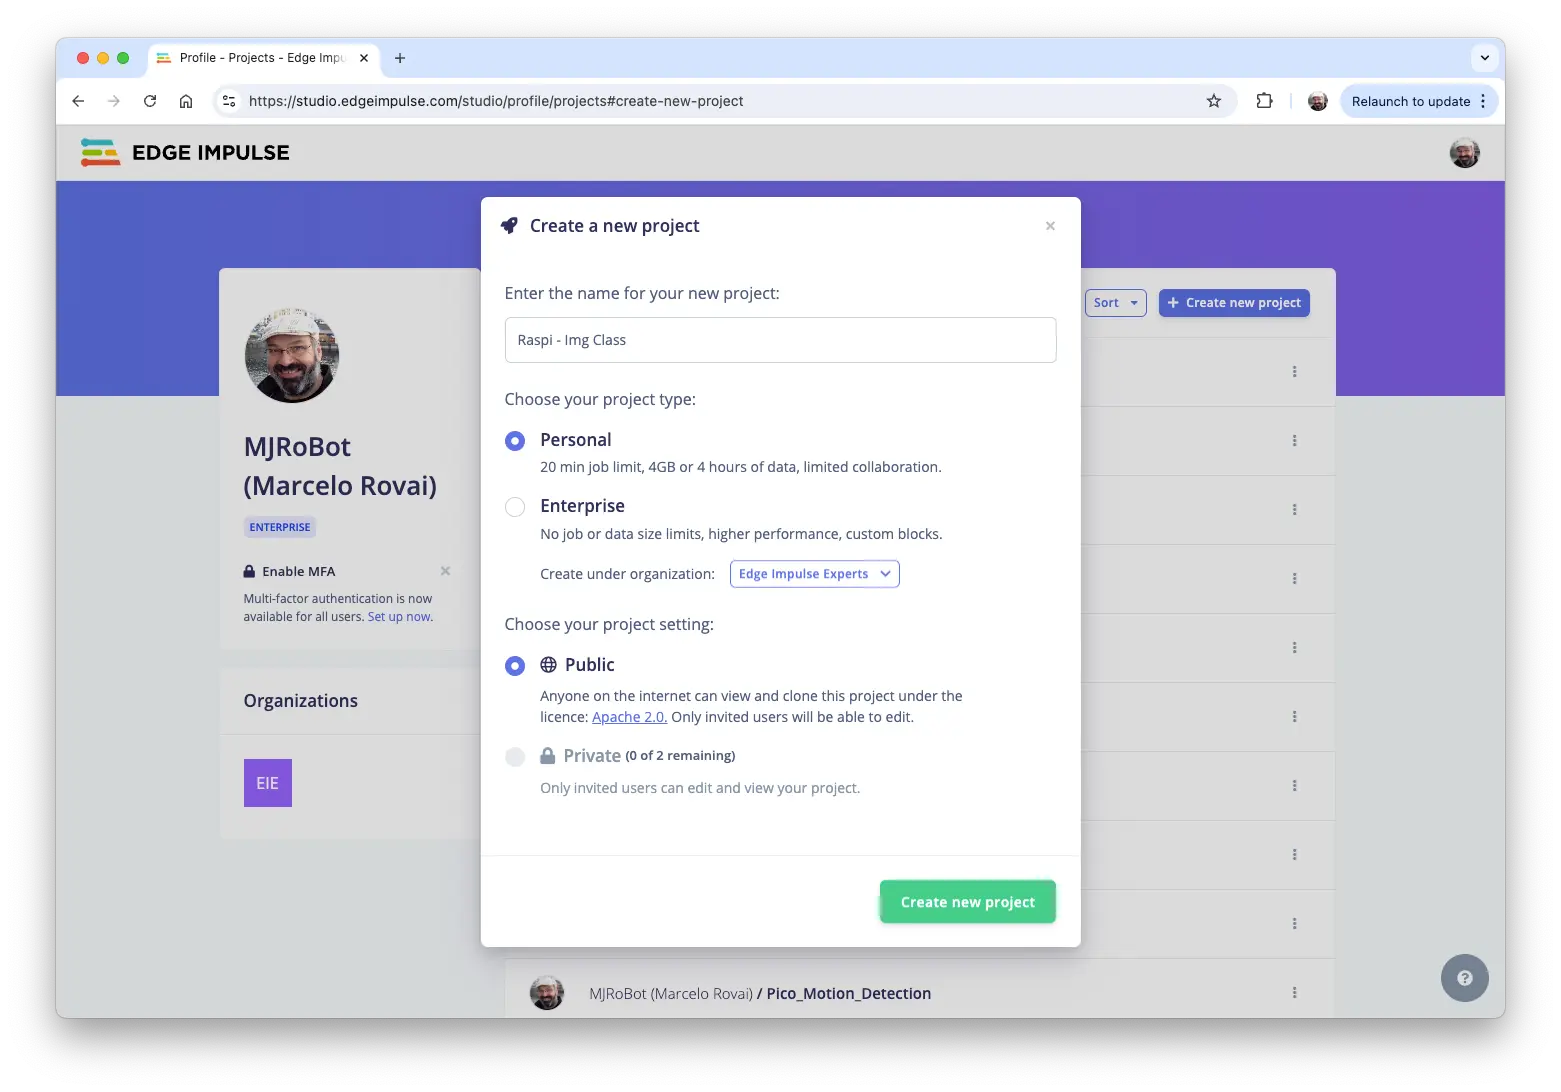
可克隆类似项目: Raspi - Img Class
数据集
在 Studio 中,主要分为四步:数据集、Impulse 设计、测试、部署。
数据集需拆分为训练集、验证集和测试集。测试集仅用于最终评估,验证集用于训练过程。
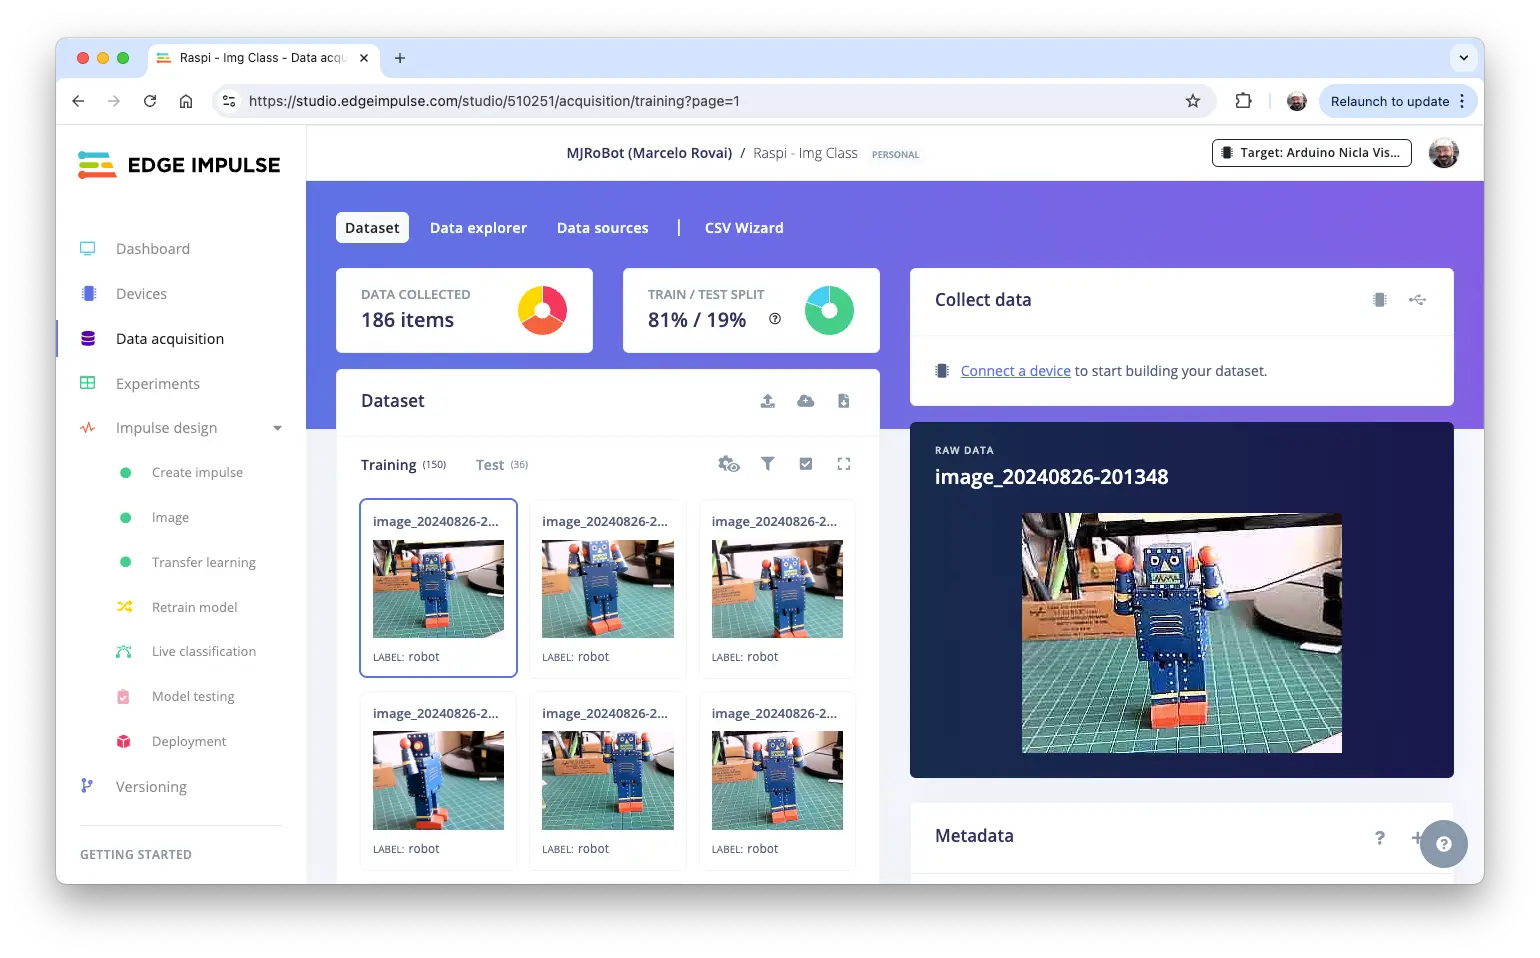
上传数据步骤:
- 进入
Data acquisition,在UPLOAD DATA区上传各类别图片 - 由 Studio 自动划分训练/测试集,选择对应标签
- 重复上传三类图片,最终可在 Studio 查看原始数据
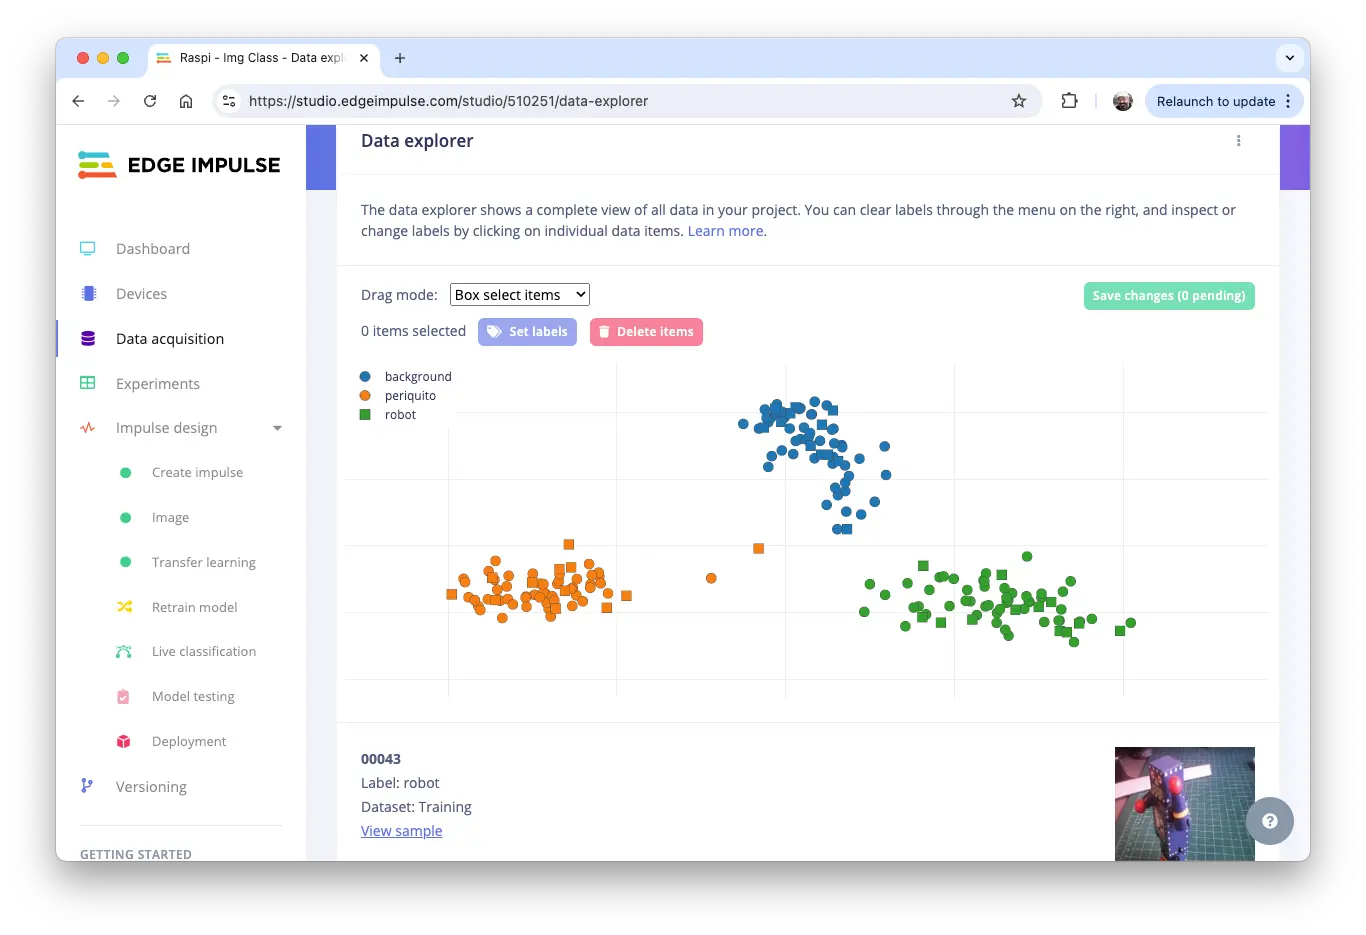
Studio 支持数据浏览、标签修改等操作:
Impulse 设计
本阶段需:
- 数据预处理:调整图片尺寸、色彩深度(RGB/灰度)
- 模型选择:采用
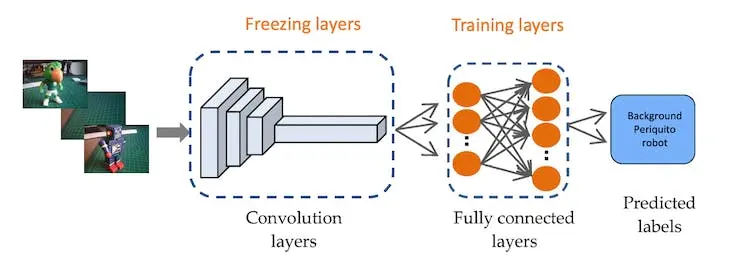
Transfer Learning (Images),微调预训练 MobileNet V2,适合小样本数据集
Transfer Learning 利用 MobileNet 预训练特征,少量数据即可获得较好精度,适合嵌入式设备。

通过迁移学习,训练速度快、资源消耗低,适合快速原型和边缘部署。
在 Impulse 设计页,设置图片尺寸 $160\times 160$,选择 Image 和 Transfer Learning,保存配置。
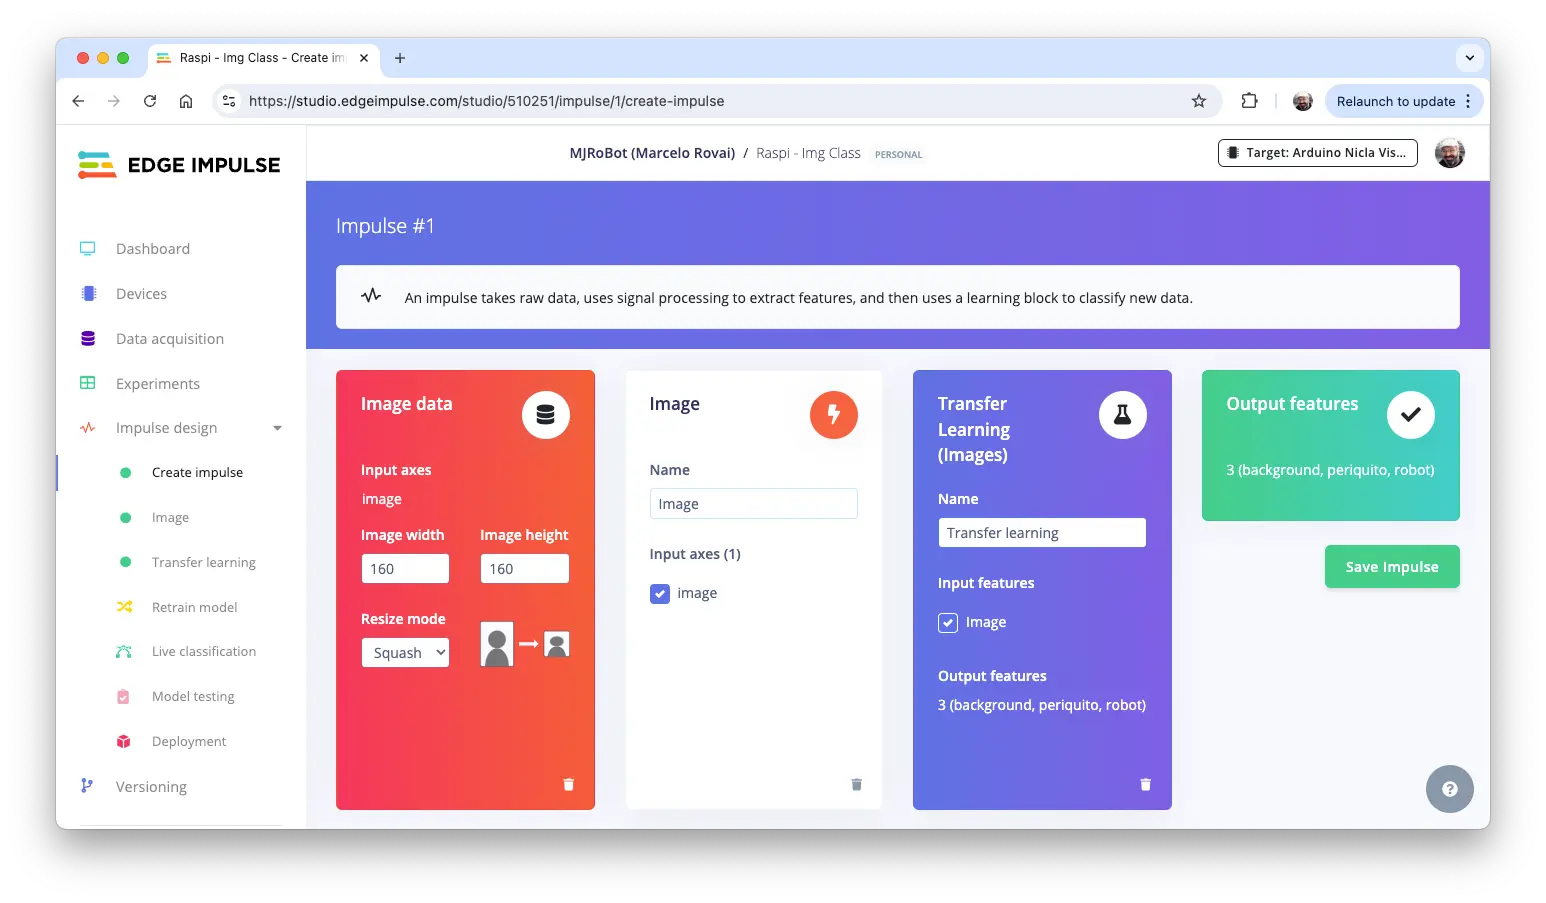
图片预处理
所有输入图片将转换为 $160\times 160\times 3$ 特征。
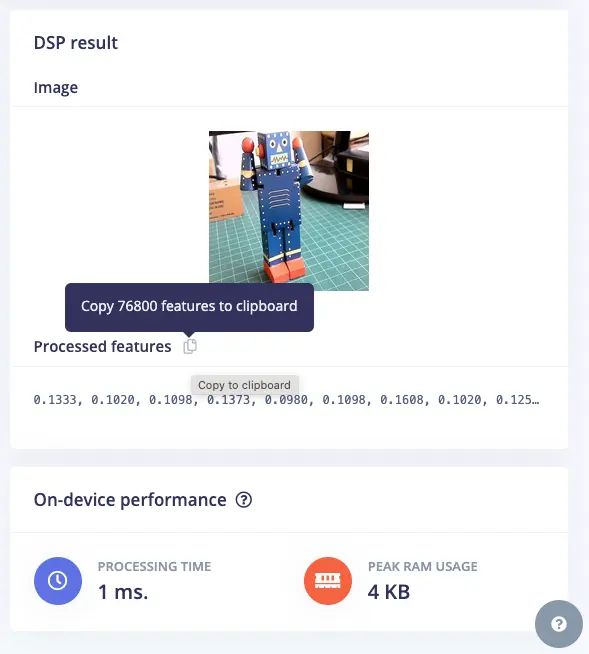
保存参数后,进入下一步生成特征。
模型设计
MobileNet 是高效的卷积神经网络,适合移动和嵌入式视觉应用。MobileNetV2 采用倒残差结构和深度可分离卷积,兼顾速度与精度。
本项目采用 MobileNetV2 160x160 1.0,输入图片为 $160\times 160$,宽度系数 1.0,平衡模型大小、速度和精度。
模型训练
数据增强(Data Augmentation)可提升模型泛化能力。数据增强改善机器学习模型精度的原理是,在训练过程中对训练数据进行小幅随机变动(如翻转、裁剪或旋转图像),从而生成额外的人工数据。
Edge Impulse 在后台实现的数据增强策略示例:
# Implements the data augmentation policy
def augment_image(image, label):
    # Flips the image randomly
    image = tf.image.random_flip_left_right(image)

    # Increase the image size, then randomly crop it down to
    # the original dimensions
    resize_factor = random.uniform(1, 1.2)
    new_height = math.floor(resize_factor * INPUT_SHAPE[0])
    new_width = math.floor(resize_factor * INPUT_SHAPE[1])
    image = tf.image.resize_with_crop_or_pad(
        image, new_height, new_width
    )
    image = tf.image.random_crop(image, size=INPUT_SHAPE)

    # Vary the brightness of the image
    image = tf.image.random_brightness(image, max_delta=0.2)

    return image, label
数据增强可防止模型“记忆”训练集表面特征,更好地学习深层模式。
最终全连接层设为 0 神经元,10% dropout 防止过拟合。训练结果如下:
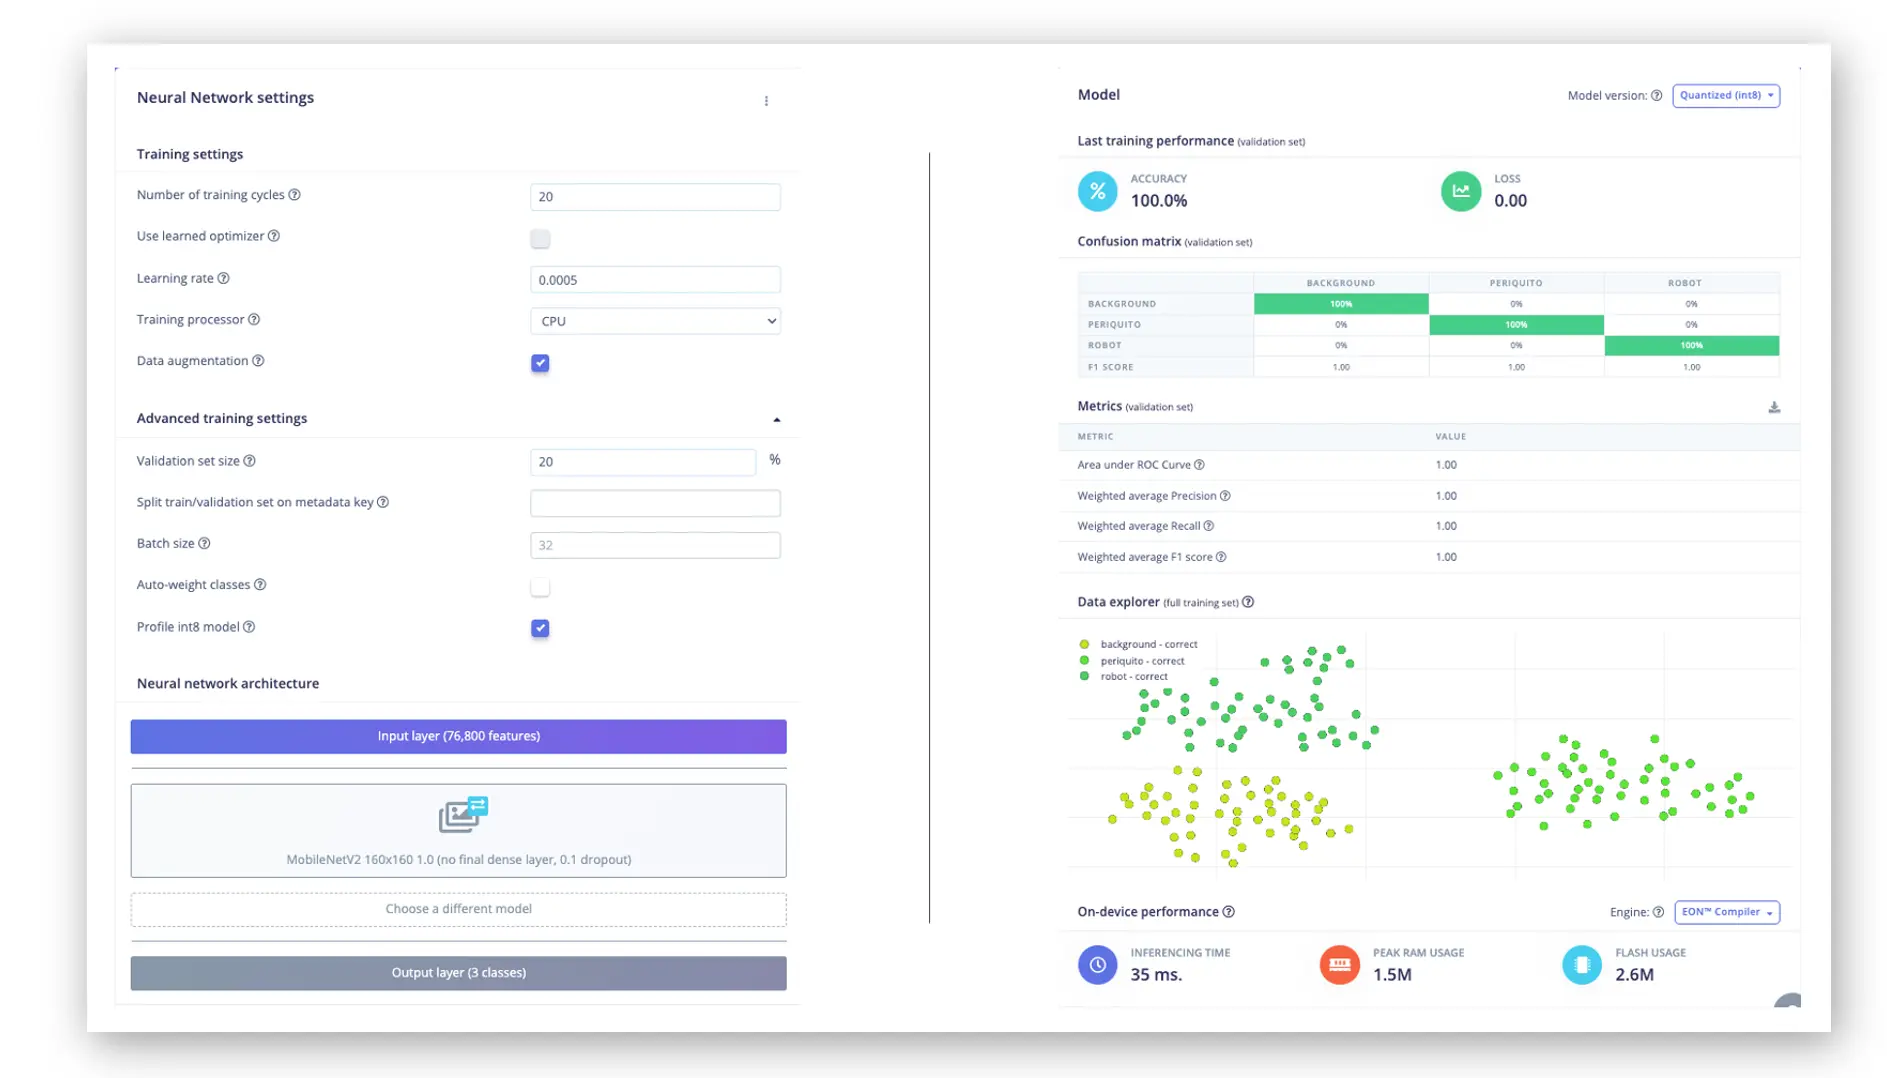
在 Raspi-4 上延迟约 35ms,约 30fps。Raspi-Zero 稍慢,Raspi-5 更快。
精度与速度权衡
如需更快推理,可减小输入尺寸或 alpha(宽度系数),但需权衡精度。对比如下:
- 减小输入尺寸:大幅提升速度,但可能损失细节和精度
- 降低 alpha:线性减少参数,速度提升有限,但保留更多细节
建议根据实际需求实验不同组合,找到最佳平衡点。
最优配置需结合精度、速度和图片特性综合考虑,建议多种方案对比测试。
模型测试
用预留测试集评估模型,准确率达 92.22%。
部署模型
如前述,将训练好的 .tflite 模型部署到树莓派推理。
在 Dashboard 页下载 int8 量化模型:
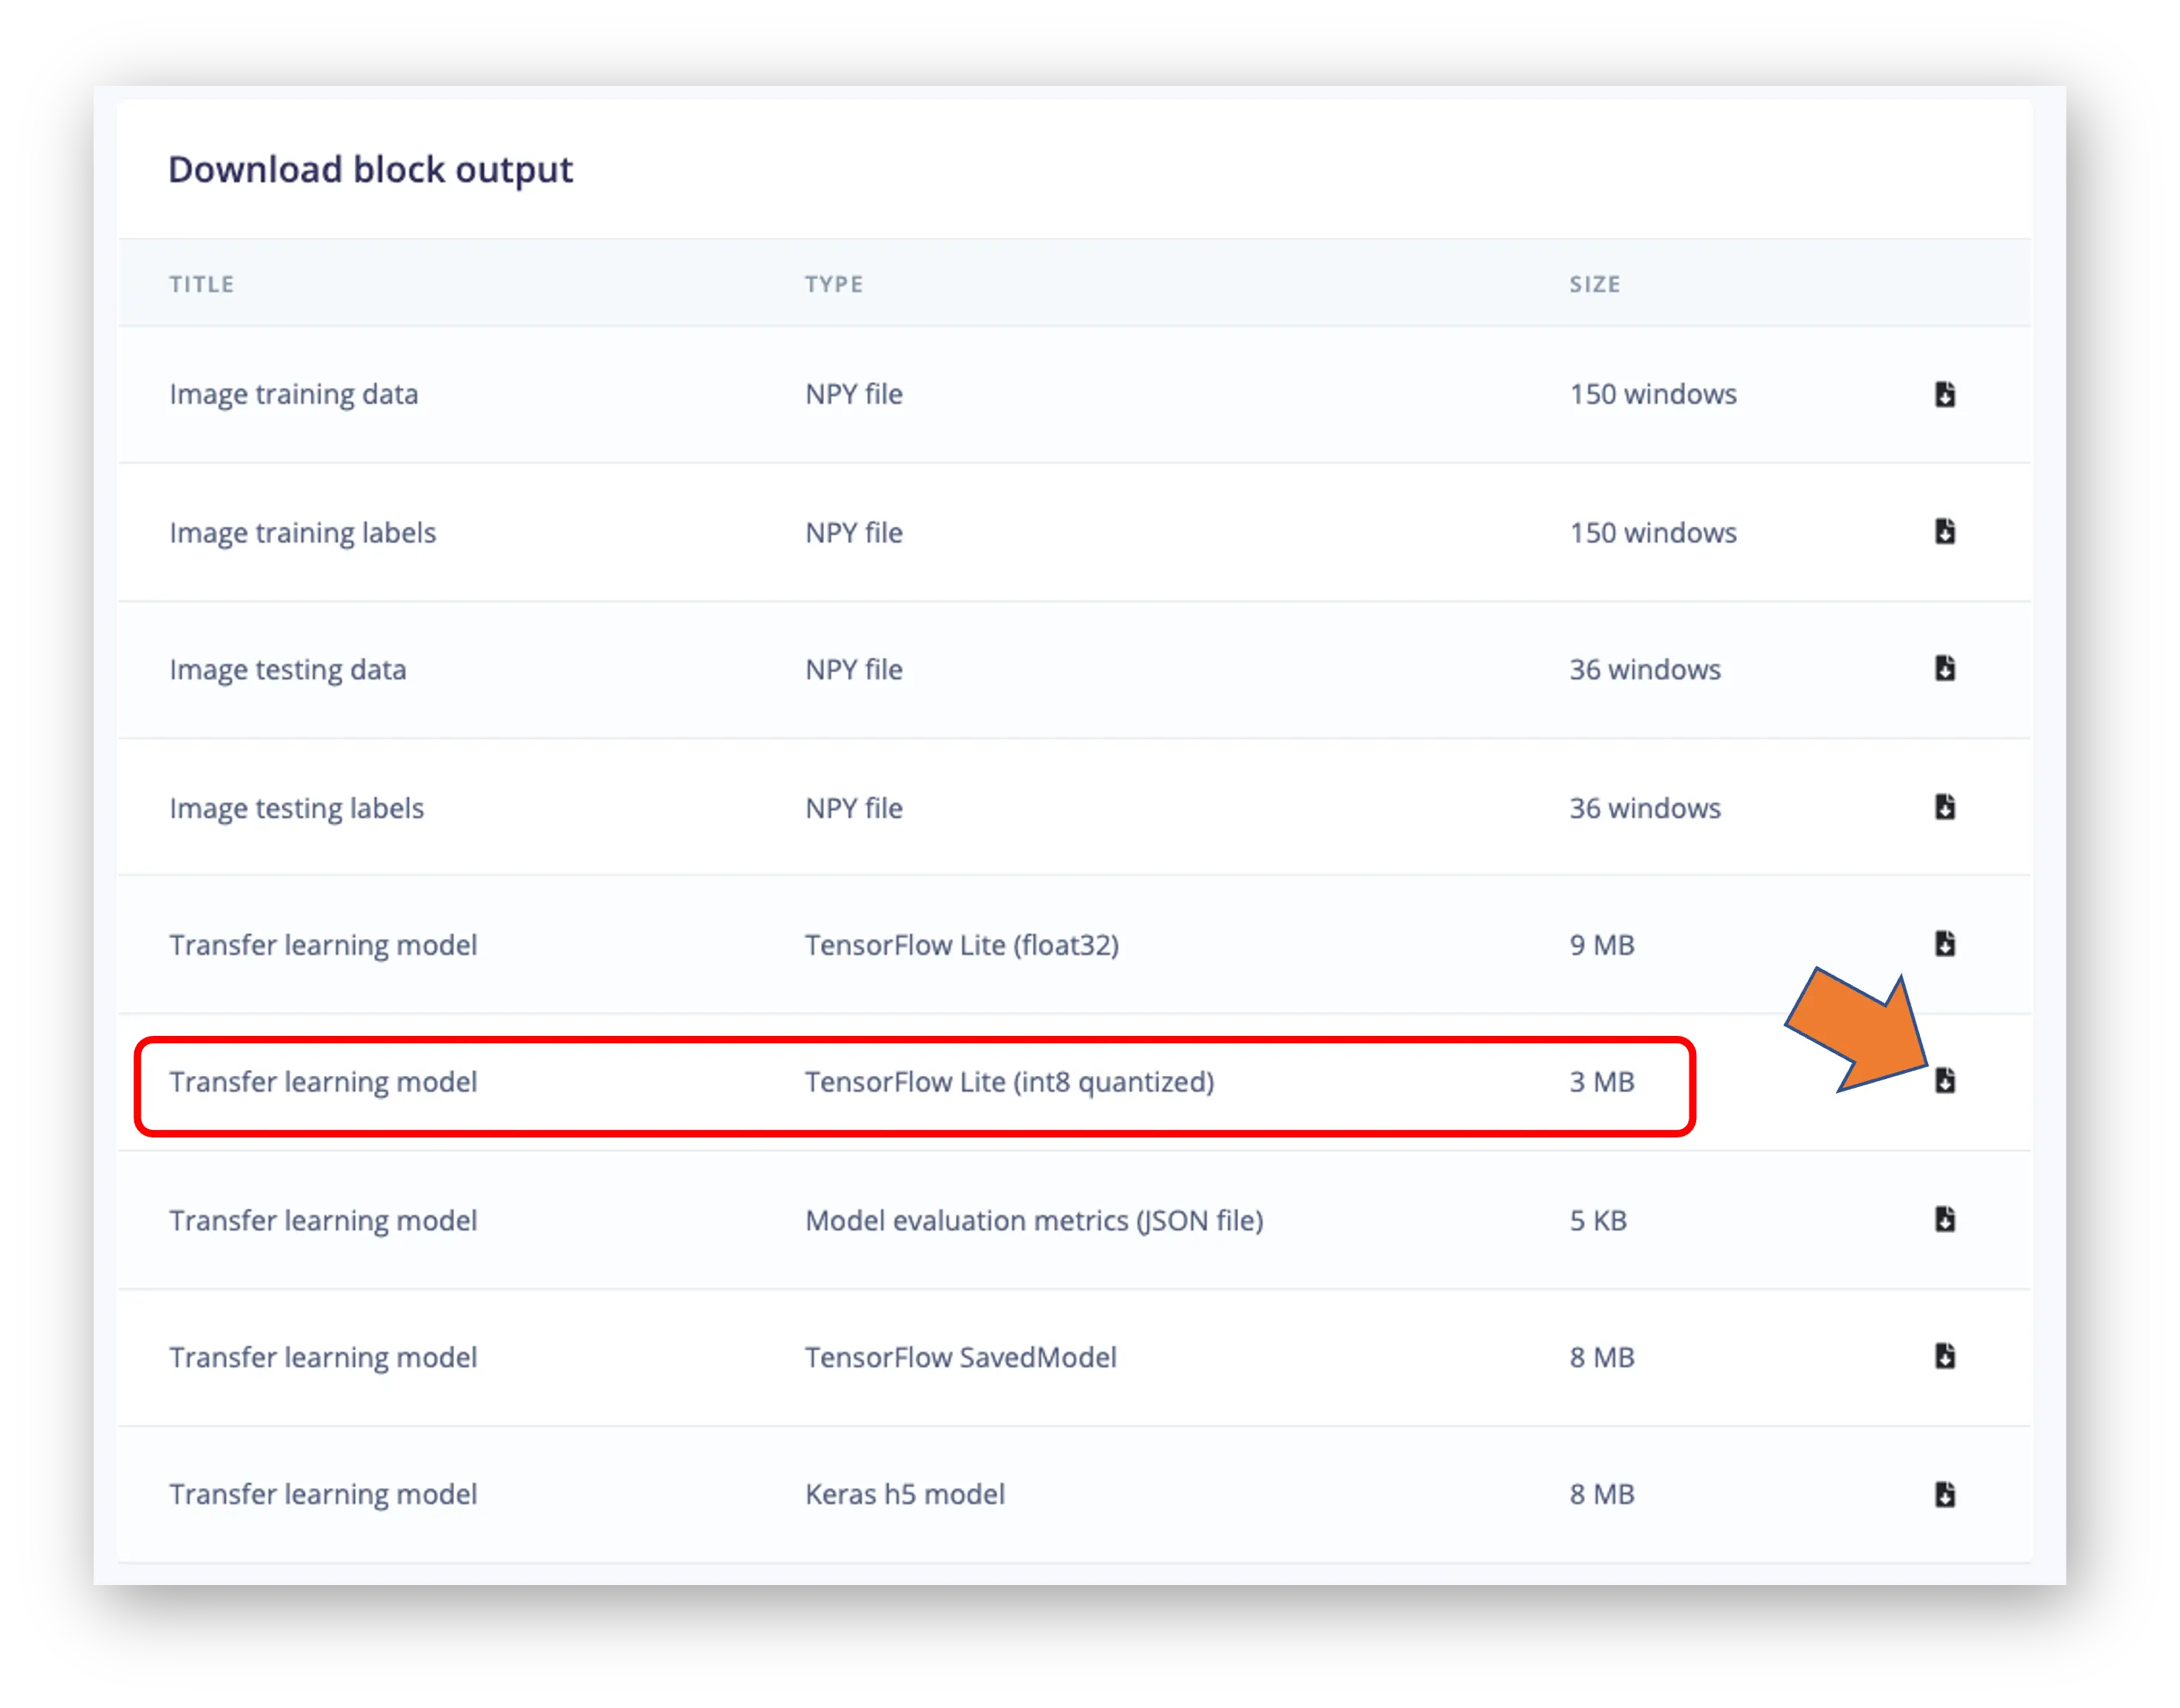
建议同时下载 float32 版本对比
通过 FileZilla 等工具将模型传至树莓派(./models),并准备测试图片(./images)。
导入所需库:
import time
import numpy as np
import matplotlib.pyplot as plt
from PIL import Image
import tflite_runtime.interpreter as tflite
定义路径和标签:
img_path = "./images/robot.jpg"
model_path = "./models/ei-raspi-img-class-int8-quantized-model.tflite"
labels = ["background", "periquito", "robot"]
Edge Impulse Studio 训练的模型输出索引为 0,1,2,标签按字母序排列。
加载模型、分配张量、获取输入输出信息:
# Load the TFLite model
interpreter = tflite.Interpreter(model_path=model_path)
interpreter.allocate_tensors()

# Get input and output tensors
input_details = interpreter.get_input_details()
output_details = interpreter.get_output_details()
注意模型输入 dtype 为 int8,需将图片像素(0-255)归一化并量化:
input_dtype = input_details[0]["dtype"]
input_dtype
numpy.int8
图片预处理:
scale, zero_point = input_details[0]["quantization"]
img = img.resize(
    (input_details[0]["shape"][1], input_details[0]["shape"][2])
)
img_array = np.array(img, dtype=np.float32) / 255.0
img_array = (
    (img_array / scale + zero_point).clip(-128, 127).astype(np.int8)
)
input_data = np.expand_dims(img_array, axis=0)
确认输入张量:
input_data.shape, input_data.dtype
((1, 160, 160, 3), dtype('int8'))
推理并计算延迟:
# Inference on Raspi-Zero
start_time = time.time()
interpreter.set_tensor(input_details[0]["index"], input_data)
interpreter.invoke()
end_time = time.time()
inference_time = (end_time - start_time) * 1000  # 转换为毫秒
print("推理时间:{:.1f}ms".format(inference_time))
Raspi-Zero 推理约 125ms,Raspi-5 更快。
获取输出标签和概率,Edge Impulse Studio 训练的模型输出已 softmax,可直接使用:
# Obtain results and map them to the classes
predictions = interpreter.get_tensor(output_details[0]["index"])[
        0
    ]

# Get indices of the top k results
top_k_results = 3
top_k_indices = np.argsort(predictions)[::-1][:top_k_results]

# Get quantization parameters
scale, zero_point = output_details[0]["quantization"]

# Dequantize the output
dequantized_output = (
    predictions.astype(np.float32) - zero_point
) * scale
probabilities = dequantized_output

print("\n\t[PREDICTION]        [Prob]\n")
for i in range(top_k_results):
    print(
        "\t{:20}: {:.2f}%".format(
            labels[top_k_indices[i]],
            probabilities[top_k_indices[i]] * 100,
        )
    )
修改前述函数,兼容不同模型类型:
def image_classification(
    img_path, model_path, labels, top_k_results=3, apply_softmax=False
):
    # load the image
    img = Image.open(img_path)
    plt.figure(figsize=(4, 4))
    plt.imshow(img)
    plt.axis("off")

    # Load the TFLite model
    interpreter = tflite.Interpreter(model_path=model_path)
    interpreter.allocate_tensors()

    # Get input and output tensors
    input_details = interpreter.get_input_details()
    output_details = interpreter.get_output_details()

    # Preprocess
    img = img.resize(
        (input_details[0]["shape"][1], input_details[0]["shape"][2])
    )

    input_dtype = input_details[0]["dtype"]

    if input_dtype == np.uint8:
        input_data = np.expand_dims(np.array(img), axis=0)
    elif input_dtype == np.int8:
        scale, zero_point = input_details[0]["quantization"]
        img_array = np.array(img, dtype=np.float32) / 255.0
        img_array = (
            (img_array / scale + zero_point)
            .clip(-128, 127)
            .astype(np.int8)
        )
        input_data = np.expand_dims(img_array, axis=0)
    else:  # float32
        input_data = (
            np.expand_dims(np.array(img, dtype=np.float32), axis=0)
            / 255.0
        )

    # Inference on Raspi-Zero
    start_time = time.time()
    interpreter.set_tensor(input_details[0]["index"], input_data)
    interpreter.invoke()
    end_time = time.time()
    inference_time = (
        end_time - start_time
    ) * 1000  # 转换为毫秒

    # Obtain results
    predictions = interpreter.get_tensor(output_details[0]["index"])[
        0
    ]

    # Get indices of the top k results
    top_k_indices = np.argsort(predictions)[::-1][:top_k_results]

    # Handle output based on type
    output_dtype = output_details[0]["dtype"]
    if output_dtype in [np.int8, np.uint8]:
        # Dequantize the output
        scale, zero_point = output_details[0]["quantization"]
        predictions = (
            predictions.astype(np.float32) - zero_point
        ) * scale

    if apply_softmax:
        # Apply softmax
        exp_preds = np.exp(predictions - np.max(predictions))
        probabilities = exp_preds / np.sum(exp_preds)
    else:
        probabilities = predictions

    print("\n\t[PREDICTION]        [Prob]\n")
    for i in range(top_k_results):
        print(
            "\t{:20}: {:.1f}%".format(
                labels[top_k_indices[i]],
                probabilities[top_k_indices[i]] * 100,
            )
        )
    print("\n\t推理时间:{:.1f}ms".format(inference_time))
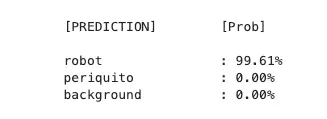
测试 int8 量化模型(160x160 alpha=1.0):
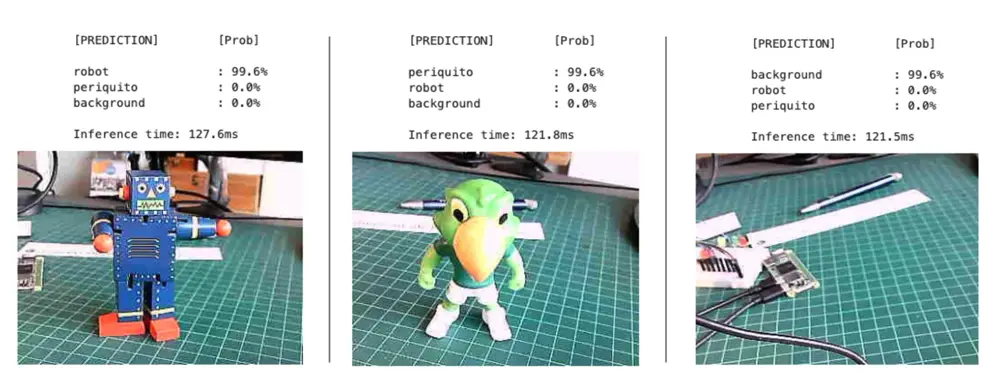
测试更小模型(如 Nicla Vision Lab,int8 量化,96x96,alpha=0.1):
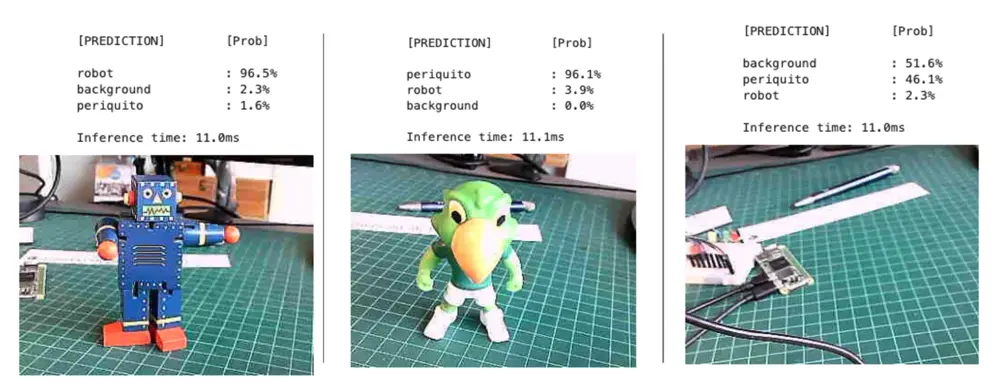
精度略降,但速度提升约 10 倍,适合对细节要求不高的场景。
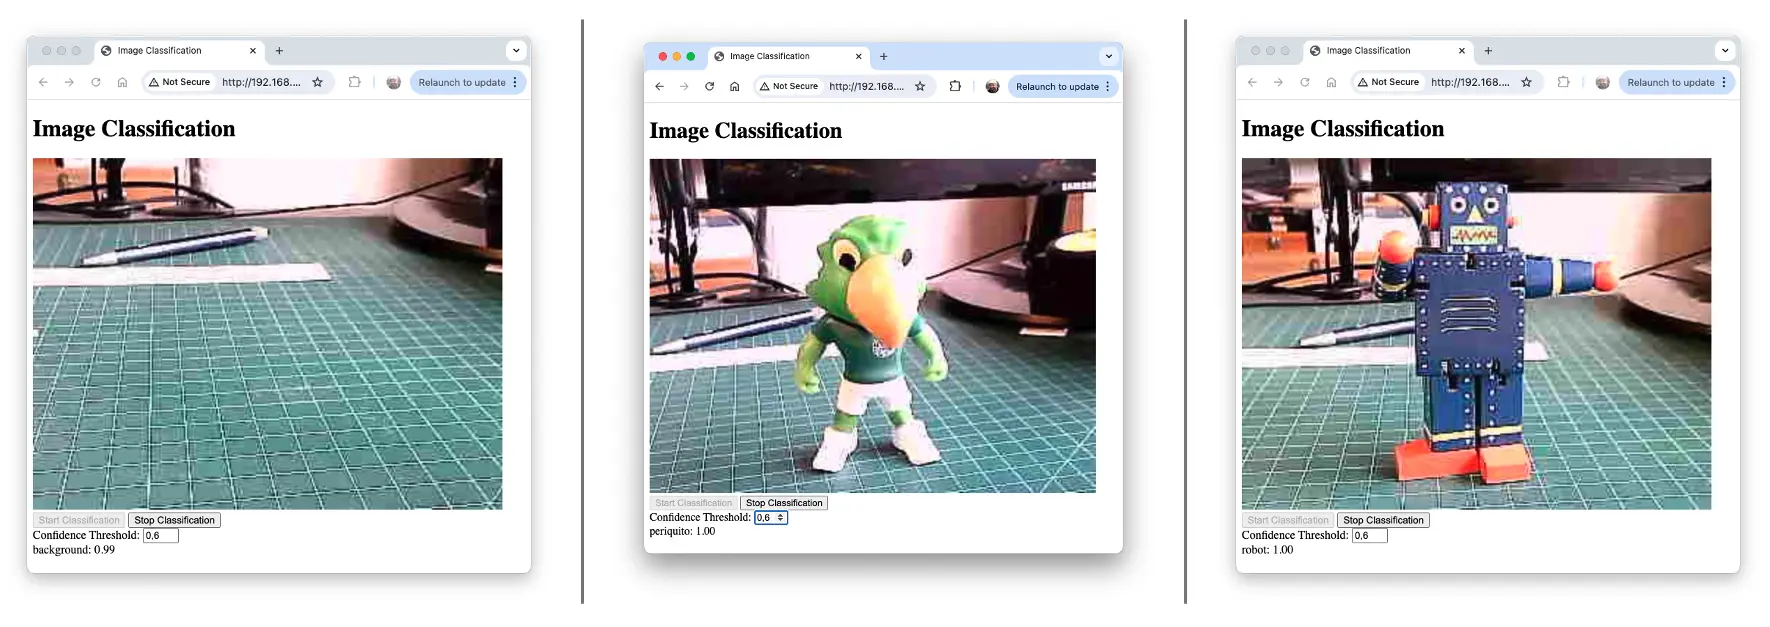
实时图像分类
开发实时摄像头采集与分类应用,实时显示分类结果。
保存为 img_class_live_infer.py:
from flask import Flask, Response, render_template_string,
                  request, jsonify
from picamera2 import Picamera2
import io
import threading
import time
import numpy as np
from PIL import Image
import tflite_runtime.interpreter as tflite
from queue import Queue

app = Flask(__name__)

# Global variables
picam2 = None
frame = None
frame_lock = threading.Lock()
is_classifying = False
confidence_threshold = 0.8
model_path = "./models/ei-raspi-img-class-int8-quantized-\
                model.tflite"
labels = ['background', 'periquito', 'robot']
interpreter = None
classification_queue = Queue(maxsize=1)

def initialize_camera():
    global picam2
    picam2 = Picamera2()
    config = picam2.create_preview_configuration(
        main={"size": (320, 240)}
    )
    picam2.configure(config)
    picam2.start()
    time.sleep(2)  # Wait for camera to warm up

def get_frame():
    global frame
    while True:
        stream = io.BytesIO()
        picam2.capture_file(stream, format='jpeg')
        with frame_lock:
            frame = stream.getvalue()
        time.sleep(0.1)  # Capture frames more frequently

def generate_frames():
    while True:
        with frame_lock:
            if frame is not None:
                yield (
                   b'--frame\r\n'
                   b'Content-Type: image/jpeg\r\n\r\n'
                   + frame + b'\r\n'
                )
        time.sleep(0.1)

def load_model():
    global interpreter
    if interpreter is None:
        interpreter = tflite.Interpreter(model_path=model_path)
        interpreter.allocate_tensors()
    return interpreter

def classify_image(img, interpreter):
    input_details = interpreter.get_input_details()
    output_details = interpreter.get_output_details()

    img = img.resize((input_details[0]['shape'][1],
                      input_details[0]['shape'][2]))
    input_data = np.expand_dims(np.array(img), axis=0)\
           .astype(input_details[0]['dtype'])

    interpreter.set_tensor(input_details[0]['index'], input_data)
    interpreter.invoke()

    predictions = interpreter.get_tensor(output_details[0]
                                         ['index'])[0]
    # Handle output based on type
    output_dtype = output_details[0]['dtype']
    if output_dtype in [np.int8, np.uint8]:
        # Dequantize the output
        scale, zero_point = output_details[0]['quantization']
        predictions = (predictions.astype(np.float32) -
                       zero_point) * scale
    return predictions

def classification_worker():
    interpreter = load_model()
    while True:
        if is_classifying:
            with frame_lock:
                if frame is not None:
                    img = Image.open(io.BytesIO(frame))
            predictions = classify_image(img, interpreter)
            max_prob = np.max(predictions)
            if max_prob >= confidence_threshold:
                label = labels[np.argmax(predictions)]
            else:
                label = '不确定'
            classification_queue.put({
                 'label': label,
                 'probability': float(max_prob)
            })
        time.sleep(0.1)  # Adjust based on your needs

@app.route('/')
def index():
   return render_template_string('''
      <!DOCTYPE html>
      <html>
      <head>
          <title>图像分类</title>
          <script
           src="https://code.jquery.com/jquery-3.6.0.min.js">
          </script>
          <script>
              function startClassification() {
                  $.post('/start');
                  $('#startBtn').prop('disabled', true);
                  $('#stopBtn').prop('disabled', false);
              }
              function stopClassification() {
                  $.post('/stop');
                  $('#startBtn').prop('disabled', false);
                  $('#stopBtn').prop('disabled', true);
              }
              function updateConfidence() {
                  var confidence = $('#confidence').val();
                  $.post('/update_confidence',
                         {confidence: confidence}
                        );
              }
              function updateClassification() {
                  $.get('/get_classification', function(data) {
                    $('#classification').text(data.label + ': '
                    + data.probability.toFixed(2));
                  });
              }
              $(document).ready(function() {
                  setInterval(updateClassification, 100);
                  // 每 100ms 更新一次
              });
          </script>
      </head>
      <body>
          <h1>图像分类</h1>
          <img src="{{ url_for('video_feed') }}"
               width="640"
               height="480" />

          <br>
          <button id="startBtn"
                  onclick="startClassification()">
            开始分类
          </button>

          <button id="stopBtn"
                  onclick="stopClassification()"
                  disabled>
            停止分类
          </button>

          <br>
          <label for="confidence">置信度阈值:</label>
          <input type="number"
                 id="confidence"
                 name="confidence"
                 min="0" max="1"
                 step="0.1"
                 value="0.8"
                 onchange="updateConfidence()" />

          <br>
          <div id="classification">
             等待分类中...
          </div>

      </body>
      </html>
   ''')

@app.route('/video_feed')
def video_feed():
    return Response(
       generate_frames(),
       mimetype='multipart/x-mixed-replace; boundary=frame'
    )

@app.route('/start', methods=['POST'])
def start_classification():
    global is_classifying
    is_classifying = True
    return '', 204

@app.route('/stop', methods=['POST'])
def stop_classification():
    global is_classifying
    is_classifying = False
    return '', 204

@app.route('/update_confidence', methods=['POST'])
def update_confidence():
    global confidence_threshold
    confidence_threshold = float(request.form['confidence'])
    return '', 204

@app.route('/get_classification')
def get_classification():
    if not is_classifying:
        return jsonify({'label': '未在分类',
                       'probability': 0})
    try:
        result = classification_queue.get_nowait()
    except Queue.Empty:
        result = {'label': '处理中', 'probability': 0}
    return jsonify(result)

if __name__ == '__main__':
    initialize_camera()
    threading.Thread(target=get_frame, daemon=True).start()
    threading.Thread(target=classification_worker,
                     daemon=True).start()
    app.run(host='0.0.0.0', port=5000, threaded=True)
在终端运行:
python3 img_class_live_infer.py
浏览器访问:
- 树莓派本机:
http://localhost:5000 - 局域网其他设备:
http://<raspberry_pi_ip>:5000,如http://192.168.4.210:5000/
桌面端效果截图:
演示视频:
https://www.youtube.com/watch?v=o1QsQrpCMw4
主要组件
- Flask Web 应用:提供界面与接口
- PiCamera2:摄像头采集
- TensorFlow Lite:模型推理
- 多线程:保证流畅体验
主要特性
- 实时摄像头画面
- 实时分类结果
- 可调置信心阈值
- 支持启动/停止分类
代码结构
- 导入与全局变量
- 摄像头相关函数
- 模型加载与推理函数
- 分类线程
- Flask 路由
- HTML 模板
- 主程序入口
关键点
- 多线程并发,保证采集、推理与 Web 服务互不阻塞
- 实时更新分类结果,无需刷新页面
- 模型一次加载,多次复用
- 支持动态调整参数
使用方法
- 安装依赖
- 树莓派运行脚本
- 浏览器访问 Web 界面
- 启动分类并调整参数
总结
图像分类作为机器学习的强大应用,已在医疗、环境监测等领域展现巨大价值。本章系统演示了如何在 Raspi-Zero、Raspi-5 等边缘设备上实现高效的图像分类系统,展现了实时本地智能的潜力。
我们完整走通了数据采集、模型训练(Edge Impulse Studio)、部署与推理的全流程,重点包括:
- 数据采集与预处理对模型效果至关重要
- 迁移学习可借助预训练模型(如 MobileNet V2),小样本高效训练
- 精度与速度权衡,边缘设备需合理取舍
- 实时分类 Web 应用,展示实际落地场景
在边缘设备上运行模型,带来低延迟、高隐私、离线可用等优势,适用于物联网、自动化、实时监控等场景。
即便在算力有限的设备上,也能实现令人满意的精度与速度。通过调整模型参数(如输入尺寸、alpha),可灵活满足不同项目需求。
展望未来,边缘 AI 与图像分类领域仍在快速发展,模型压缩、硬件加速和高效网络架构将进一步拓展边缘视觉能力。
本项目为更复杂的计算机视觉应用奠定基础,鼓励大家持续探索边缘 AI 与物联网的创新实践。无论是工业自动化、智能家居还是环境监测,本文涵盖的技能和理念都将助力你的创新项目。
参考资源
[树莓派图像分类 Notebook]( https://github.com/Mjrovai/EdgeML-with