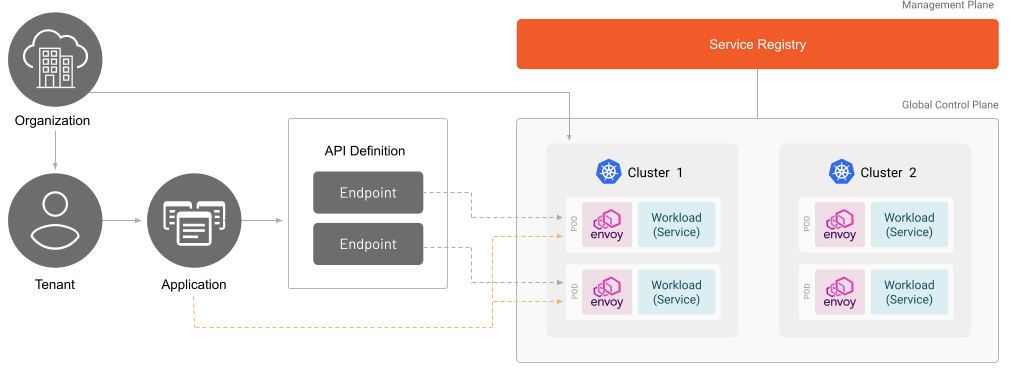
在 TSB 中,Application 表示一组逻辑上相关的 Services,这些服务与彼此相关,并公开一组实现完整业务逻辑的 APIs。

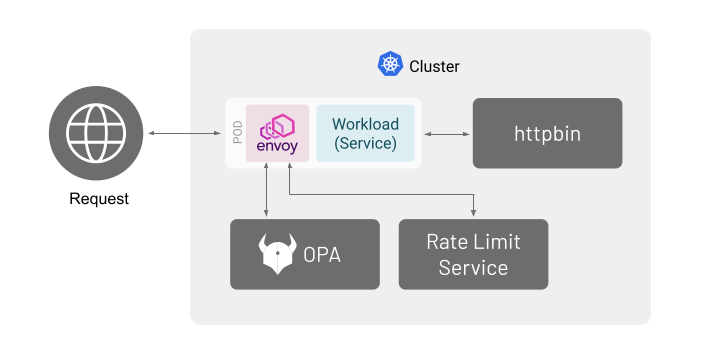
TSB 可以在配置 API 运行时策略时利用 OpenAPI 注解。在本文档中,你将启用通过 Open Policy Agent (OPA) 进行授权,以及通过外部服务进行速率限制。每个请求都需要经过基本授权,并为每个有效用户强制执行速率限制策略。

在开始之前,请确保你已经:
- 熟悉 TSB 概念
- 熟悉 Open Policy Agent (OPA)
- 熟悉 Envoy 外部授权和速率限制
- 安装了 TSB 演示 环境
- 熟悉 Istio Bookinfo 示例应用程序
- 创建了 租户
部署 httpbin 服务
按照 本文档中的说明 创建 httpbin 服务。完成该文档中的所有步骤。
TSB 特定注解
以下额外的 TSB 特定注解可以添加到 OpenAPI 规范中,以配置 API。
| 注解 | 描述 |
|---|---|
| x-tsb-service | TSB 中提供 API 的上游服务名称,如在 TSB 服务注册表中看到的(可以使用 tctl get services 来检查)。 |
| x-tsb-cors | 服务器的 CORS 策略。 |
| x-tsb-tls | 服务器的 TLS 设置。如果省略,则服务器将配置为提供纯文本连接。secretName 字段必须指向集群中现有的 Kubernetes 密钥。 |
| x-tsb-external-authorization | 服务器的 OPA 设置。 |
| x-tsb-ratelimiting | 外部速率限制服务器(例如 envoyproxy/ratelimit)设置。 |
配置 API
在名为 httpbin-api.yaml 的文件中创建以下 API 定义。
httpbin-api.yaml
apiversion: application.tsb.tetrate.io/v2
kind: API
metadata:
  organization: <organization>
  tenant: <tenant>
  application: httpbin
  name: httpbin-ingress-gateway
spec:
  description: Httpbin OpenAPI
  workloadSelector:
    namespace: httpbin
    labels:
      app: httpbin-gateway
  openapi: |
    openapi: 3.0.1
    info:
      version: '1.0-oas3'
      title: httpbin
      description: An unofficial OpenAPI definition for httpbin
      x-tsb-service: httpbin.httpbin

    servers:
      - url: https://httpbin.tetrate.com
        x-tsb-cors:
          allowOrigin:
            - "*"
        x-tsb-tls:
          mode: SIMPLE
          secretName: httpbin-certs
    paths:
      /get:
        get:
          tags:
            - HTTP methods
          summary: |
            Returns the GET request's data.
          responses:
            '200':
              description: OK
              content:
                application/json:
                  schema:
                    type: object
在此场景中,你将仅使用 httpbin 服务提供的一个 API (/get)。如果要使用 httpbin 的所有 API,请从此链接获取它们的 OpenAPI 规范。
使用 tctl 应用:
tctl apply -f httpbin-api.yaml
此时,你应该能够向 httpbin Ingress Gateway 发送请求。
由于你无法控制 httpbin.tetrate.com,因此必须欺骗 curl,让它认为 httpbin.tetrate.com 解析为 Ingress Gateway 的 IP 地址。
使用以下命令获取之前创建的 Ingress Gateway 的 IP 地址。
kubectl -n httpbin get service httpbin-gateway -o jsonpath='{.status.loadBalancer.ingress[0].ip}'
执行以下命令,通过 Tier-1 Gateway 向 httpbin 服务发送 HTTP 请求。将 gateway-ip 替换为你在上一步中获取的值。还需要传递 CA 证书,你应该在部署 httpbin 服务的步骤中创建。
curl -I "https://httpbin.tetrate.com/get" \
  --resolve "httpbin.tetrate.com:443:<gateway-ip>" \
  --cacert httpbin.crt
你应该会看到成功的 HTTP 响应。
使用 OPA 进行授权
一旦通过 OpenAPI 注解正确公开 API,就可以配置 OPA 以与 API 网关进行通信。
在此示例中,你将创建一个策略,检查请求头中的基本身份验证。如果用户已经通过身份验证,用户名称将被添加到 x-user 头,以便稍后由速率限制服务用于强制执行每个用户的配额。
配置 OPA
创建 opa 命名空间,用于部署 OPA 及其配置:
kubectl create namespace opa
创建名为 openapi-policy.rego 的文件:
openapi-policy.rego
package demo.authz

default allow = false

# username and password database
user_passwords = {
    "alice": "password",
    "bob": "password"
}

allow = response {
    # check if password from header is same as in database for the specific user
    basic_auth.password == user_passwords[basic_auth.user_name]
    response := {
      "allowed": true,
      "headers": {"x-user": basic_auth.user_name}
    }
}

basic_auth := {"user_name": user_name, "password": password} {
    v := input.attributes.request.http.headers.authorization
    startswith(v, "Basic ")
    s := substring(v, count("Basic "), -1)
    [user_name, password] := split(base64url.decode(s), ":")
}
然后使用你创建的文件创建一个 ConfigMap:
kubectl -n opa create configmap opa-policy \
  --from

-file=openapi-policy.rego
创建使用上面的策略配置的 Deployment 和 Service 对象,文件名为 opa.yaml。
opa.yaml
apiVersion: v1
kind: Service
metadata:
  name: opa
  namespace: opa
spec:
  selector:
    app: opa
  ports:
    - name: grpc
      protocol: TCP
      port: 9191
      targetPort: 9191
---
apiVersion: apps/v1
kind: Deployment
metadata:
  name: opa
  namespace: opa
spec:
  replicas: 1
  selector:
    matchLabels:
      app: opa
  template:
    metadata:
      labels:
        app: opa
      name: opa
    spec:
      containers:
        - image: openpolicyagent/opa:0.29.4-envoy-2
          name: opa
          securityContext:
            runAsUser: 1111
          ports:
            - containerPort: 8181
          args:
            - 'run'
            - '--server'
            - '--addr=localhost:8181'
            - '--diagnostic-addr=0.0.0.0:8282'
            - '--set=plugins.envoy_ext_authz_grpc.addr=:9191'
            - '--set=plugins.envoy_ext_authz_grpc.path=demo/authz/allow'
            - '--set=decision_logs.console=true'
            - '--ignore=.*'
            - '/policy/openapi-policy.rego'
          livenessProbe:
            httpGet:
              path: /health?plugins
              scheme: HTTP
              port: 8282
            initialDelaySeconds: 5
            periodSeconds: 5
          readinessProbe:
            httpGet:
              path: /health?plugins
              scheme: HTTP
              port: 8282
            initialDelaySeconds: 5
            periodSeconds: 5
          volumeMounts:
            - readOnly: true
              mountPath: /policy
              name: opa-policy
      volumes:
        - name: opa-policy
          configMap:
            name: opa-policy
然后应用该清单:
kubectl apply -f opa.yaml
最后,打开之前创建的 httpbin-api.yaml 文件,并在 server 组件中添加 x-tsb-external-authorization 注解:
    ...
    servers:
      - url: https://httpbin.tetrate.com
        ...
        x-tsb-external-authorization:
          uri: grpc://opa.opa.svc.cluster.local:9191
然后再次应用更改:
tctl apply -f httpbin-api.yaml
测试
要进行测试,请执行以下命令,根据需要替换用户名、密码和 gateway-ip 的值。
curl -u <username>:<password> \
  "https://httpbin.tetrate.com/get" \
  --resolve "httpbin.tetrate.com:443:<gateway-ip>" \
  --cacert httpbin.crt
  -s \
  -o /dev/null \
  -w "%{http_code}\n"
| 用户名 | 密码 | 状态码 |
|---|---|---|
alice |
password |
200 |
bob |
password |
200 |
<anything else> |
<anything else> |
403 (*1) |
(*1) 请参阅文档以获取更多详细信息
使用外部服务进行速率限制
TSB 支持速率限制的内部和外部模式。在此示例中,你将部署一个单独的 Envoy 速率限制服务。
配置速率限制
创建 ext-ratelimit 命名空间,用于部署速率限制服务器及其配置:
kubectl create namespace ext-ratelimit
创建名为 ext-ratelimit-config.yaml 的文件。此配置指定用户 alice 的速率限制为每分钟 10 次请求,用户 bob 的速率限制为每分钟 2 次请求。
ext-ratelimit-config.yaml
domain: httpbin-ratelimit
descriptors:
  - key: x-user-descriptor
    value: alice
    rate_limit:
      unit: minute
      requests_per_unit: 10
  - key: x-user-descriptor
    value: bob
    rate_limit:
      unit: minute
      requests_per_unit: 2
然后使用你创建的文件创建一个 ConfigMap:
kubectl -n ext-ratelimit create configmap ext-ratelimit \
  --from-file=config.yaml=ext-ratelimit-config.yaml
现在,你需要部署 Redis 和 envoyproxy/ratelimit。创建一个名为 redis-ratelimit.yaml 的文件,内容如下:
redis-ratelimit.yaml
# Copyright Istio Authors
#
#   Licensed under the Apache License, Version 2.0 (the "License");
#   you may not use this file except in compliance with the License.
#   You may obtain a copy of the License at
#
#       http://www.apache.org/licenses/LICENSE-2.0
#
#   Unless required by applicable law or agreed to in writing, software
#   distributed under the License is distributed on an "AS IS" BASIS,
#   WITHOUT WARRANTIES OR CONDITIONS OF ANY KIND, either express or implied.
#   See the License for the specific language governing permissions and
#   limitations under the License.

####################################################################################
# Redis service and deployment
# Ratelimit service and deployment
####################################################################################
apiVersion: v1
kind: Service
metadata:
  name: redis
  namespace: ext-ratelimit
  labels:
    app: redis
spec:
  ports:
    - name: redis
      port: 6379
  selector:
    app: redis
---
apiVersion: apps/v1
kind: Deployment
metadata:
  name: redis
  namespace: ext-ratelimit
spec:
  replicas: 1
  selector:
    matchLabels:
      app: redis
  template:
    metadata:
      labels:
        app: redis
    spec:
      containers:
        - image: redis:alpine
          imagePullPolicy: Always
          name: redis
          ports:
            - name: redis
              containerPort: 6379
      restartPolicy: Always
      serviceAccountName: ''
---
apiVersion: v1
kind: Service
metadata:
  name: ratelimit
  namespace: ext-ratelimit
  labels:
    app: ratelimit
spec:
  ports:
    - name: http-port
      port: 8080
      targetPort: 8080
      protocol: TCP
    - name: grpc-port
      port: 8081
      targetPort: 8081
      protocol: TCP
    - name: http-debug
      port: 6070
      targetPort: 6070
      protocol: TCP
  selector:
    app: ratelimit
---
apiVersion: apps/v1
kind: Deployment
metadata:
  name: ratelimit
  namespace: ext-ratelimit
spec:
  replicas: 1
  selector:
    matchLabels:
      app: ratelimit
  strategy:
    type: Recreate
  template:
    metadata:
      labels:
        app: ratelimit
    spec:
      containers:
        - image: envoyproxy/ratelimit:6f5de117 # 2021/01/08
          imagePullPolicy: Always
          name: ratelimit
          command: ['/bin/ratelimit']
          env:
            - name: LOG_LEVEL
              value: debug
            - name: REDIS_SOCKET_TYPE
              value: tcp
            - name: REDIS_URL
              value: redis:6379
            - name: USE_STATSD
              value: 'false'
            - name: RUNTIME_ROOT
              value: /data
            - name: RUNTIME_SUBDIRECTORY
              value: ratelimit
          ports:
            - containerPort: 8080
            - containerPort: 8081
            - containerPort: 6070
          volumeMounts:
            - name: config-volume
              mountPath: /data/ratelimit/config/config.yaml
              subPath: config.yaml
      volumes:
        - name: config-volume
          configMap:
            name: ratelimit-config
如果一切顺利,你应该有一个运行正常的速率限制服务器。下一步是向 OpenAPI 对象添加 x-tsb-ratelimiting 注解:
接下来,通过在 OpenAPI 服务器对象中添加以下 x-tsb-ratelimiting 注解来更新你的 OpenAPI 规范:
...
    servers:
      - url: https://httpbin.tetrate.com
        ...
       x-tsb-external-ratelimiting:
          domain: "httpbin-ratelimit"
          rateLimitServerUri: "grpc://ratelimit.ext-ratelimit.svc.cluster.local:8081"
          rules:
            - dimensions:
              - requestHeaders:
                  headerName: x-user
                  descriptorKey: x-user-descriptor

...
测试
要进行测试,请执行以下命令,根据需要替换用户名、密码和 gateway-ip 的值。
curl -u <username>:<password> \
  "https://httpbin.tetrate.com/get" \
  --resolve "httpbin.tetrate.com:443:<gateway-ip>" \
  --cacert httpbin.crt
  -s \
  -o /dev/null \
  -w "%{http_code}\n"
首先,尝试使用用户名 alice 和密码 password 发送多个请求。在第 10 次请求之前,你应该收到状态码 200。之后,你应该在经过 10 分钟之前收到 429 响应。
尝试使用用户名 bob 和密码 password 做同样的事情。行为应该相同,只是这次你只能在开始收到 429 响应之前发送 2 个请求。
策略顺序
TSB 当前不支持指定明确的策略顺序。
相反,将隐式使用配置的创建时间戳。因此,如果你在一次性指定外部授权和速率限制服务,无法保证执行顺序。
这就是为什么在本文档中,外部授权和速率限制配置在两个单独的步骤中应用的原因,按照特定顺序。这样授权处理将在速率限制之前执行。