In the blog post Detailed Explanation of Common Authentication Methods in Microservices, we discussed OAuth 2.0 authentication, which has several implementations, with OpenID Connect (OIDC) being the most popular one. OIDC provides both authentication and authorization for users. This article will explain how to implement OIDC authentication at the API Gateway level using Envoy Gateway.
Authentication Methods Supported by Envoy Gateway
Envoy Gateway is a high-performance API gateway implemented with Envoy, supporting various authentication methods to protect APIs and microservices:
- JWT Authentication: Uses JSON Web Tokens (JWT) for authentication.
- mTLS (Mutual TLS): Ensures secure communication between client and server using mutual TLS.
- HTTP Basic Authentication: Uses username and password for basic authentication.
- OIDC Authentication: Uses OpenID Connect protocol for identity verification and authorization.
- External Authentication: Calls external HTTP or gRPC services to check if incoming HTTP requests are authenticated.
This article focuses on configuring and using OIDC authentication in Envoy Gateway to achieve Single Sign-On at the gateway level.
What is OIDC?
OpenID Connect (OIDC) is an identity verification protocol built on OAuth 2.0. It allows clients to verify a user’s identity via an authentication server and obtain information about the user.
The OIDC authentication process is illustrated below:

OIDC adds an identity layer on top of OAuth 2.0, introducing ID tokens and a standardized UserInfo endpoint, enabling OAuth 2.0 to be used not only for authorization but also for securely verifying user identities, thus achieving Single Sign-On (SSO) and obtaining user identity information.
Why Implement Single Sign-On?
Single Sign-On (SSO) is an identity verification method that allows users to log in to multiple independent applications with one account. Through a single authentication, users can seamlessly access all related applications, reducing the hassle of repeatedly entering usernames and passwords, thereby enhancing the user experience. SSO centralizes user identity and authentication management, enhancing system security and simplifying IT management processes.
For microservices architecture, SSO is particularly important because it achieves unified authentication and authorization across various microservices, avoiding the need for each service to implement its own identity verification logic, reducing user login redundancy, and enhancing the user experience. Centralized management also unifies application security policies, effectively monitors and responds to security events, and improves overall system security. Additionally, by using standardized tokens (like JWT), SSO simplifies the identity verification process between microservices, enhancing development efficiency and allowing developers to focus on business logic implementation.
Example: Implementing Single Sign-On with Envoy Gateway and Auth0
Next, we will use Auth0 as the identity provider to demonstrate how to achieve Single Sign-On at the API Gateway level using Envoy Gateway.
Implementing Single Sign-On with Auth0
First, let’s illustrate the detailed process of implementing Single Sign-On with Auth0 in Envoy Gateway, as shown below.

Steps explanation:
- User visits the website: The user accesses
https://www.example.comvia a browser. - Request forwarding: The browser sends a GET request to Envoy Gateway.
- Check ID token: Envoy Gateway checks if the user’s request contains a valid ID token in the cookie.
- Redirect to the identity provider: If no ID token is found, Envoy Gateway redirects the user to the identity provider’s (IdP) authorization endpoint, in this case, Auth0. For more information on how Auth0 implements Login, refer to the Auth0 documentation.
- User login: The user enters their username and password on the identity provider’s login page and submits the credentials for login.
- Obtain authorization code: After a successful login, the identity provider redirects the user back to Envoy Gateway, including an authorization code in the URL.
- Exchange ID token: Envoy Gateway uses the authorization code to request an ID token from the identity provider.
- Set Cookie: The identity provider returns the ID token, which Envoy Gateway sets as a cookie for the user.
- Redirect: The URL redirected to https://www.example.com again.
- Verify ID token: Envoy Gateway verifies the ID token in the user’s request.
- Route the request: Upon successful verification, Envoy Gateway routes the request to the backend application (App).
Through this process, Envoy Gateway achieves Single Sign-On functionality. HTTP requests from users that are not authenticated will be redirected to the SSO page. Besides Auth0, Envoy Gateway also supports multiple identity providers such as Azure AD, Keycloak, Okta, OneLogin, Salesforce, UAA, and more.
Next, we will configure Auth0 and Envoy Gateway according to the sequence diagram.
Creating an Application on Auth0
Follow these steps to set up a Regular Web Application on Auth0:
- Visit Auth0 and sign up for a free account.
- Create a new application and choose Regular Web Applications.
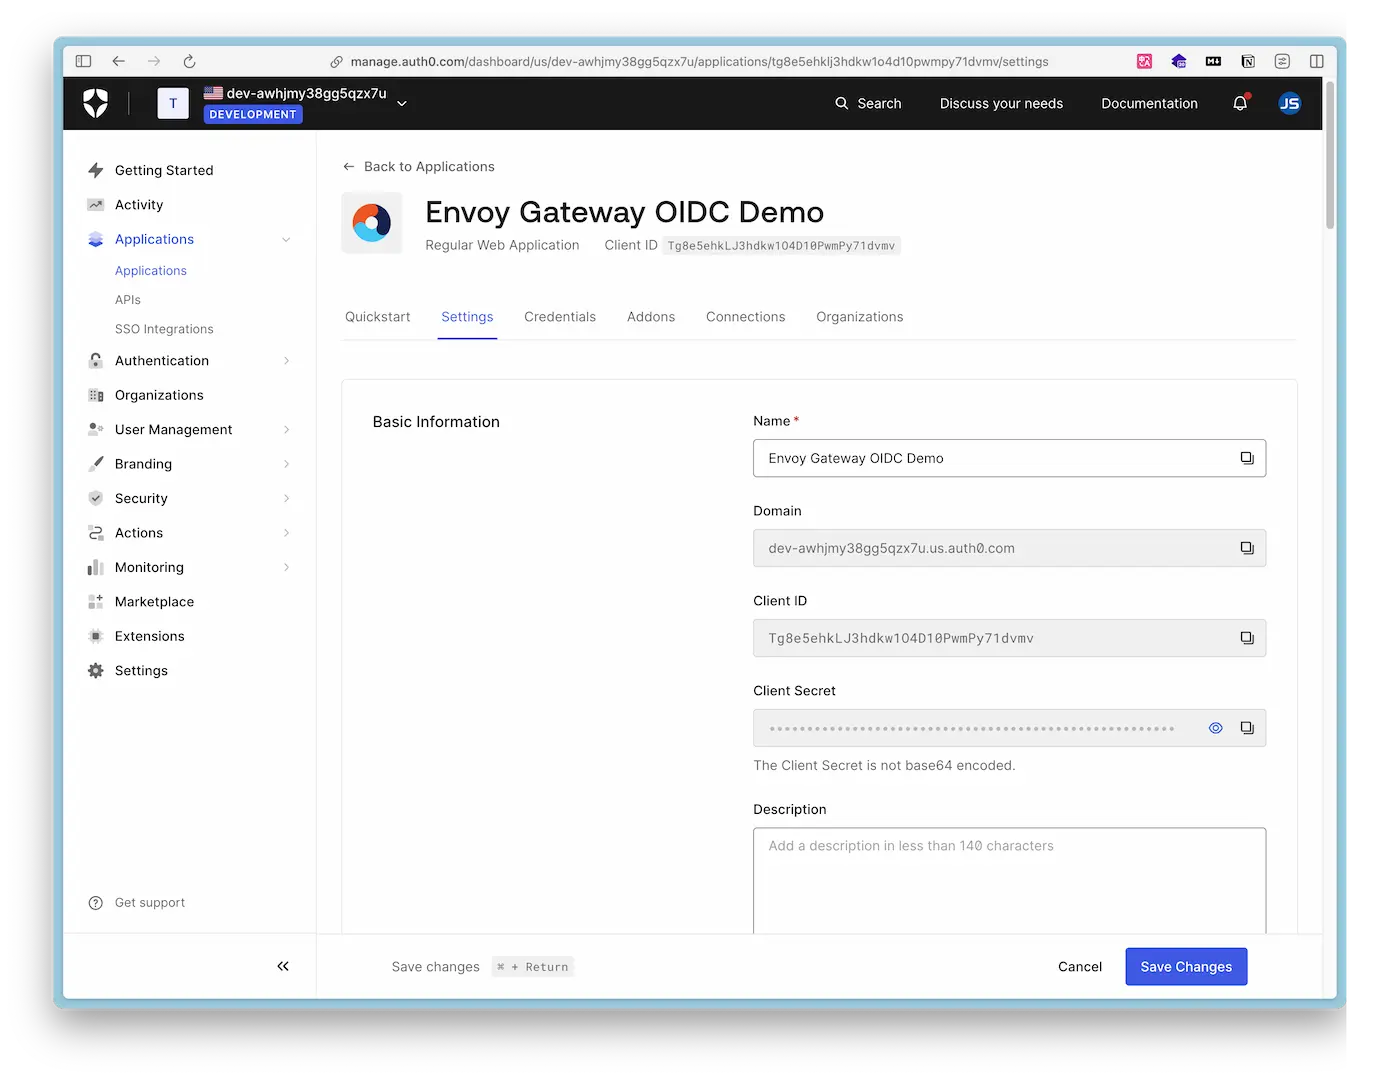
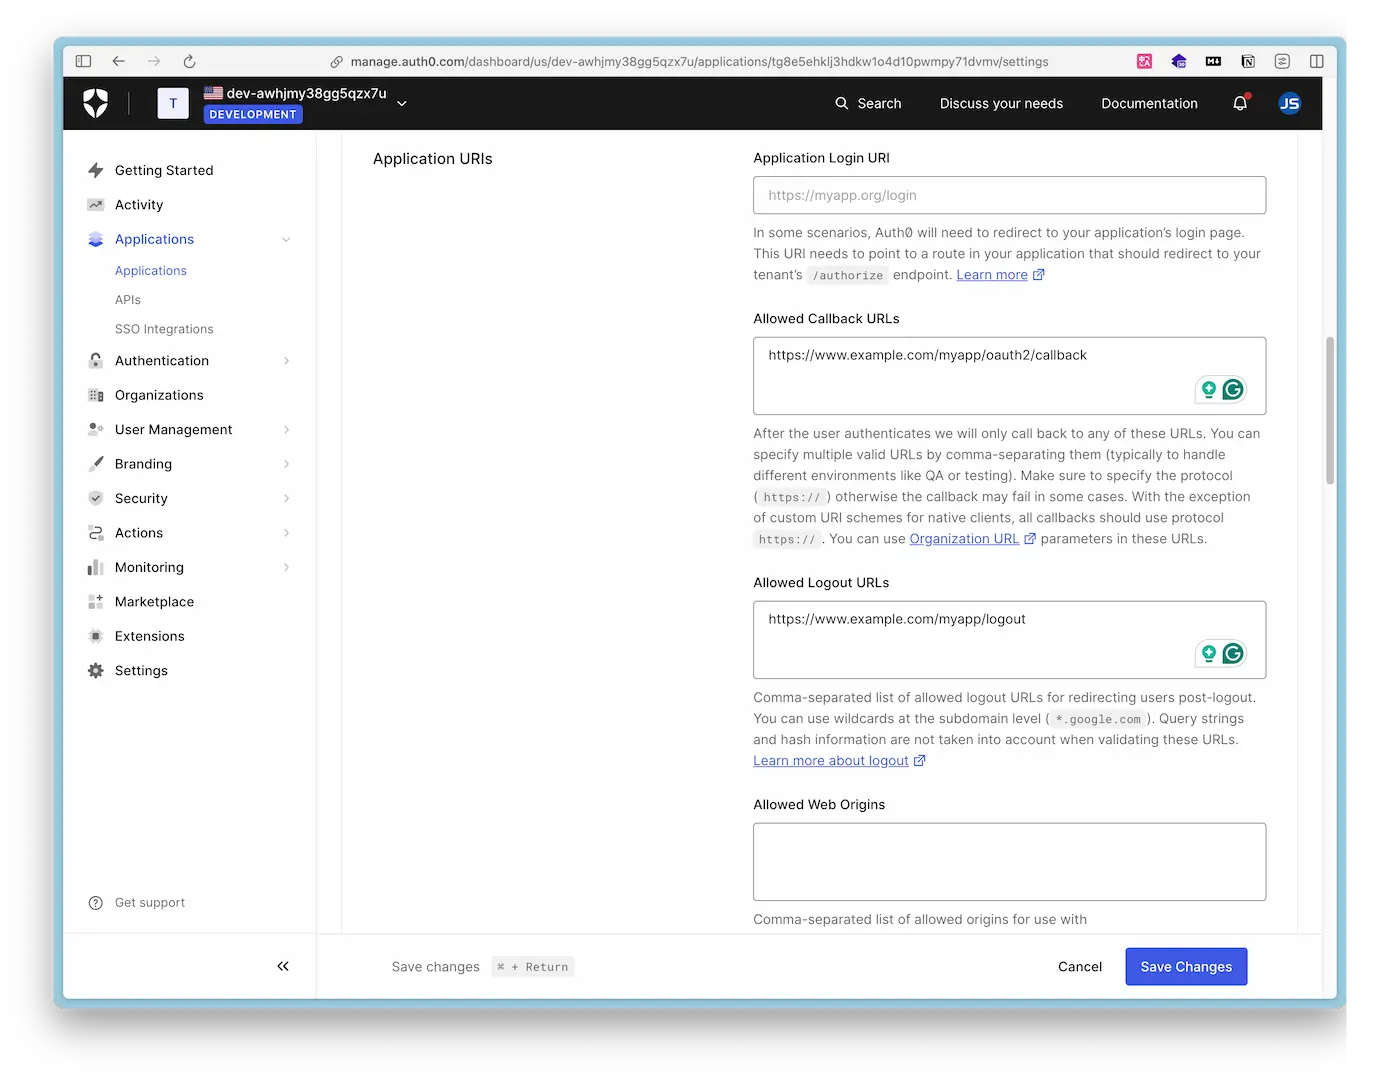
- In the application settings, record or set the following fields:
- Domain:
{DOMAIN} - Client ID:
{CLIENT_ID} - Client Secret:
{CLIENT_SECRET} - Allowed Callback URLs: https://www.example.com/oauth2/myapp/callback
- Allowed Logout URLs: https://www.example.com/myapp/logout
- Domain:
Remember these Auth0 fields as we will use them to configure the Envoy Gateway’s security policy.
Note
The Logout URL here is not functional because the backend service in our example does not implement the Auth0 logout interface. We are adding this field as a placeholder for future implementation.
Below are screenshots of the Auth0 configuration page. After setting up the user and creating a Regular Web Application, you only need to configure these two places.
This completes the configuration on Auth0. Next, we will install and configure Envoy Gateway.
Installing Envoy Gateway
Refer to the Envoy Gateway Quick Start Guide to install Envoy Gateway on minikube:
minikube start --driver=docker --cpus=2 --memory=2g
helm install eg oci://docker.io/envoyproxy/gateway-helm --version v1.0.1 -n envoy-gateway-system --create-namespace
kubectl apply -f https://github.com/envoyproxy/gateway/releases/download/v1.0.1/quickstart.yaml -n default
Refer to the Secure Gateway guide to configure TLS for Envoy Gateway:
# Create root certificate and private key to sign certificates
openssl req -x509 -sha256 -nodes -days 365 -newkey rsa:2048 -subj '/O=example Inc./CN=example.com' -keyout example.com.key -out example.com.crt

# Create certificate and private key for www.example.com
openssl req -out www.example.com.csr -newkey rsa:2048 -nodes -keyout www.example.com.key -subj "/CN=www.example.com/O=example organization"
openssl x509 -req -days 365 -CA example.com.crt -CAkey example.com.key -set_serial 0 -in www.example.com.csr -out www.example.com.crt

# Store certificates/keys in a Secret
kubectl create secret tls example-cert --key=www.example.com.key --cert=www.example.com.crt
Update the gateway created in the quickstart to include port 443 and reference the example-cert Secret in the HTTPS Listener:
echo '[
  {
    "op": "add",
    "path": "/spec/listeners/-",
    "value": {
      "name": "https",
      "protocol": "HTTPS",
      "port": 443,
      "tls": {
        "mode": "Terminate",
        "certificateRefs": [
          {
            "kind": "Secret",
            "group": "",
            "name": "example-cert"
          }
        ]
      }
    }
  }
]' | kubectl patch gateway eg --type=json --patch-file /dev/stdin
Create an HTTPRoute to add a route to the backend service for the /myapp endpoint:
cat <<EOF | kubectl apply -f -
apiVersion: gateway.networking.k8s.io/v1
kind: HTTPRoute
metadata:
  name: myapp
spec:
  parentRefs:
  - name: eg
  hostnames: ["www.example.com"]
  rules:
  - matches:
    - path:
        type: PathPrefix
        value: /myapp
    backendRefs:
    - name: backend
      port: 3000
EOF
Configuring OIDC Authentication in Envoy Gateway
Create a Kubernetes Secret to store the OAuth Client’s Client Secret:
kubectl create secret generic auth0-client-secret --from-literal=client-secret=${CLIENT_SECRET}
Note
Replace
${CLIENT_SECRET} with your Auth0 Client Secret.Create a Security Policy:
cat <<EOF | kubectl apply -f -
apiVersion: gateway.envoyproxy.io/v1alpha1
kind: SecurityPolicy
metadata:
  name: oidc-example
spec:
  targetRef:
    group: gateway.networking.k8s.io
    kind: Gateway
    name: eg
  oidc:
    provider:
      issuer: "https://${DOMAIN}"
    clientID: "${CLIENT_ID}"
    clientSecret:
      name: "auth0-client-secret"
    redirectURL: "https://www.example.com/myapp/oauth2/callback"
    logoutPath: "/myapp/logout"
EOF
Notes
- The
issuerhere should be filled with the Auth0 Domain. - The value of
redirectURLneeds to appear in the Allowed Callback URLs in the Auth0 configuration. logoutPathis mandatory, even if its URL endpoint does not implement the logout logic.
In this example, we set up OIDC for the Envoy Gateway. By modifying the targetRef to the HTTPRoute, OIDC can also be configured for individual routes. For detailed OIDC configuration, refer to the Envoy Gateway API Documentation.
Verifying Single Sign-On: Login
Add www.example.com to the local /etc/hosts file:
echo "127.0.0.1 www.example.com" | sudo tee -a /etc/hosts
Configure port forwarding for the application to access the example application locally via the domain:
export ENVOY_SERVICE=$(kubectl get svc -n envoy-gateway-system --selector=gateway.envoyproxy.io/owning-gateway-namespace=default,gateway.envoyproxy.io/owning-gateway-name=eg -o jsonpath='{.items[0].metadata.name}')

sudo kubectl -n envoy-gateway-system port-forward service/${ENVOY_SERVICE} 443:443
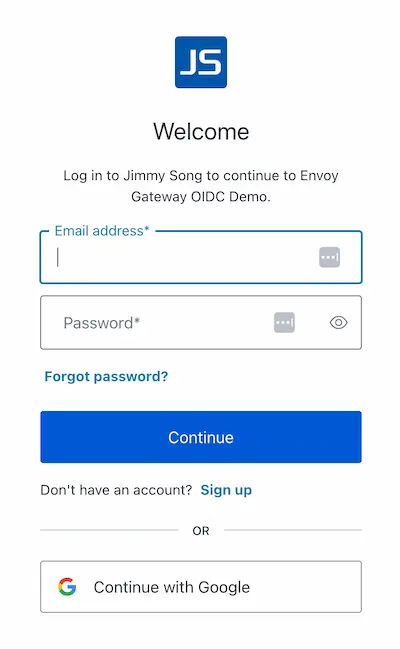
Now, visit https://www.example.com in your browser, skip the certificate risk warning, and the page will redirect to the Auth0 login page, as shown below. Choose to log in with a Google account.
After logging in, the browser will redirect back to https://www.example.com and display the HTTP request results, as shown in the JSON code below.
{
  "path": "/",
  "host": "www.example.com",
  "method": "GET",
  "proto": "HTTP/1.1",
  "headers": {
    /*Omit*/
    "Authorization": [
      "Bearer eyJhbGciOiJkaXIiLCJlbmMiOiJBMjU2R0NNIiwiaXNzIjoiaHR0cHM6Ly9kZXYtYXdoam15MzhnZzVxeng3dS51cy5hdXRoMC5jb20vIn0..IiH9LnxmnrGAVy-q.eQV_0Ssetw9mmrEaJNLlBowGJNX51awhh67WSejPrksuGU9e9-DcPJQqmR67ONFzTXWR6CFy4Rfgs4btsmEtvCtiNTCgrBHP90ddbOTg_pK31WnsQ7NThyRfGwoogSaAtK6hFrC2pxFaLj0XL7XvSPk-OaTzK1Zh1da1IM1cmWAWiBRc3nQiVWRDrExPo8-i5SawFe0jIcwytVSaRiX5Polyd3cZ7A7nlei-vDLCfj0HVzOO605nF7ED2dBSnZyev1sg14q598f3X2Vfhi2oJlnbiulGZIlpXgGbcPhzAJJxyEe6qpRpNg7Hbk8Ya-i8gUTwwNysrgm3.Zu5kD_6DzSfZPvwemttXYQ"
    ],
    "Cookie": [
      "OauthHMAC-167a6c5=RPdscXEBap0NeSIppJXoxkHt0qvMz4fNHXo2uvgDgIY=; OauthExpires-167a6c5=1716540771; BearerToken-167a6c5=eyJhbGciOiJkaXIiLCJlbmMiOiJBMjU2R0NNIiwiaXNzIjoiaHR0cHM6Ly9kZXYtYXdoam15MzhnZzVxeng3dS51cy5hdXRoMC5jb20vIn0..IiH9LnxmnrGAVy-q.eQV_0Ssetw9mmrEaJNLlBowGJNX51awhh67WSejPrksuGU9e9-DcPJQqmR67ONFzTXWR6CFy4Rfgs4btsmEtvCtiNTCgrBHP90ddbOTg_pK31WnsQ7NThyRfGwoogSaAtK6hFrC2pxFaLj0XL7XvSPk-OaTzK1Zh1da1IM1cmWAWiBRc3nQiVWRDrExPo8-i5SawFe0jIcwytVSaRiX5Polyd3cZ7A7nlei-vDLCfj0HVzOO605nF7ED2dBSnZyev1sg14q598f3X2Vfhi2oJlnbiulGZIlpXgGbcPhzAJJxyEe6qpRpNg7Hbk8Ya-i8gUTwwNysrgm3.Zu5kD_6DzSfZPvwemttXYQ; IdToken-167a6c5=eyJhbG

ciOiJSUzI1NiIsInR5cCI6IkpXVCIsImtpZCI6ImFKWkxWbnNrai0tYmhsNlJzVm51OCJ9.eyJpc3MiOiJodHRwczovL2Rldi1hd2hqbXkzOGdnNXF6eDd1LnVzLmF1dGgwLmNvbS8iLCJhdWQiOiJUZzhlNWVoa0xKM2hka3cxTzREMTBQd21QeTcxZHZtdiIsImlhdCI6MTcxNjQ1NDM3MSwiZXhwIjoxNzE2NDkwMzcxLCJzdWIiOiJnb29nbGUtb2F1dGgyfDExMjc0NDc3OTAyMjMzMTA0ODY0MCIsInNpZCI6IjRlSjhDZnZuZjd5Mm1kaE94QXBTY0JiUEhjOS1rZUVLIn0.r9dwIy_HeiO5_I3UlohLkeRES5FGoxqQnwmcA00cA_kdc5mUxgeVopXIhBUjJnTKv7bOUVJvFw21ew4gqVRJfllDyG-s_XfhSW1-lEXmCc2bGYDtOzva6k2S_VRgyMKfG04_DWFuTgO_pLtix28aYq8cGzKJ_VglT_KgRhoktzJu4Js5iCv9JPnydRJmpvRJwX3tDv_Q3mmUSazaLkhOTdiBJFrGlS07qEzJ_iWANZgR8uDNhpXdmlcqpb3MZkkMulr5-jXIgEhBQKpw28tUiSlzh6EpAVuBH9T1w8bUmFRzCc6JPPamJRfflYW5onNgYHDfcU0RpvpsCHRHRAZbdA"
    ],
    /*Omit*/
    "User-Agent": [
      "Mozilla/5.0 (Macintosh; Intel Mac OS X 10_15_7) AppleWebKit/537.36 (KHTML, like Gecko) Chrome/125.0.0.0 Safari/537.36"
    ],
    "X-Envoy-Internal": [
      "true"
    ],
    "X-Forwarded-For": [
      "10.244.0.51"
    ],
    "X-Forwarded-Proto": [
      "https"
    ],
    "X-Request-Id": [
      "c1e64057-c5c8-4fb2-a304-25c291eeed32"
    ]
  },
  "namespace": "default",
  "ingress": "",
  "service": "",
  "pod": "backend-55d64d8794-4qvgd"
}
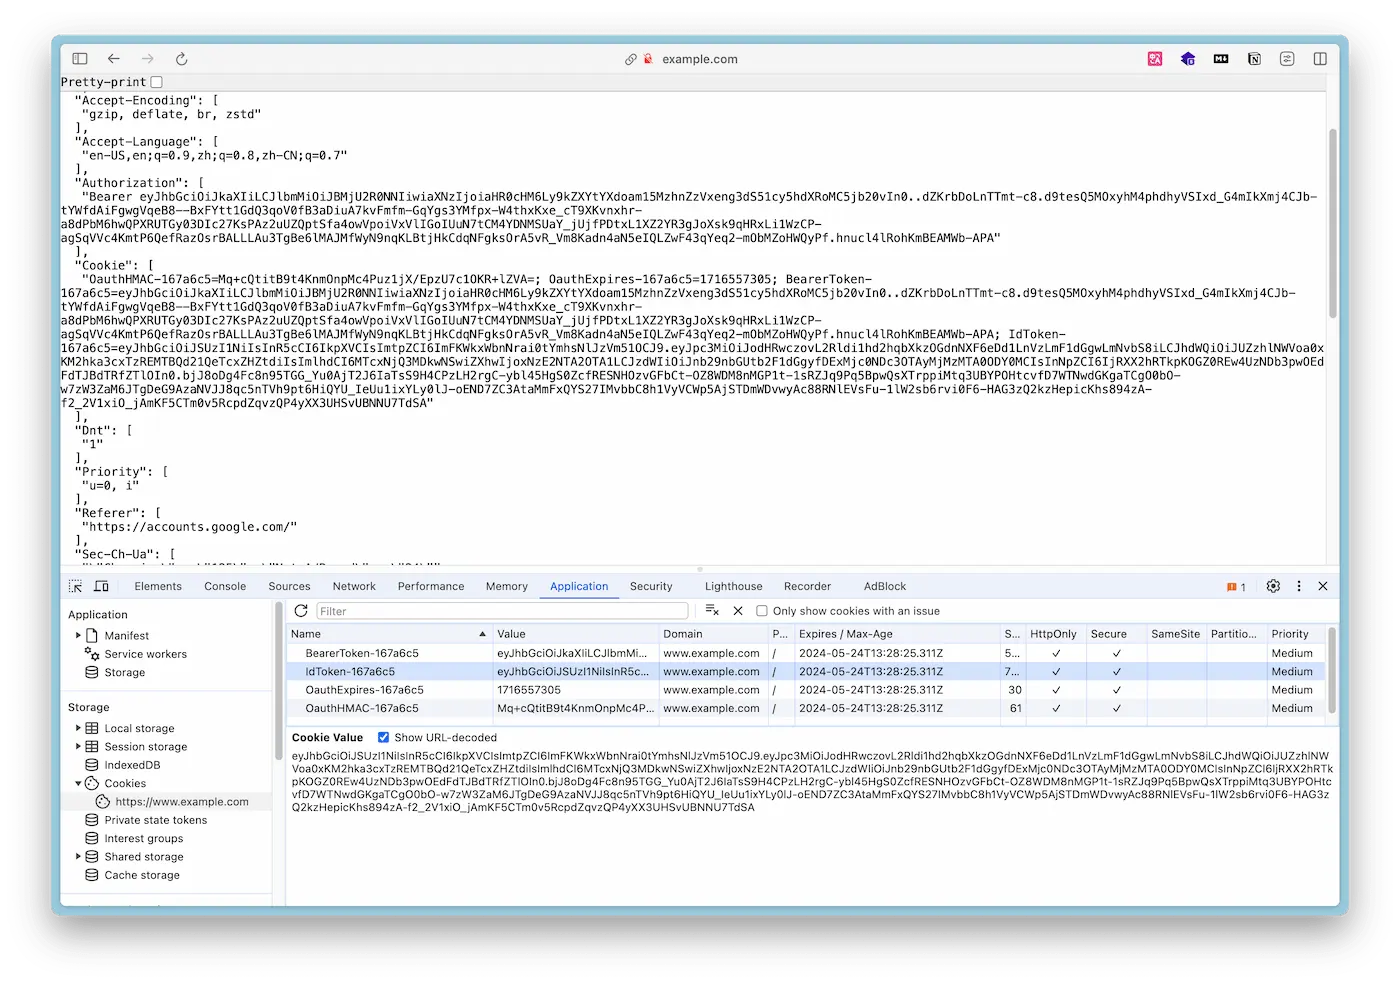
At this point, you can see the ID Token in the Chrome browser’s Inspector - Application - Cookies, as shown below:
Write a Python script validate_id_token.py to parse and validate the ID Token:
import jwt
import requests
from jwt.algorithms import RSAAlgorithm
import argparse
import json
import base64

def base64url_decode(input):
    rem = len(input) % 4
    if rem > 0:
        input += '=' * (4 - rem)
    return base64.urlsafe_b64decode(input)

def get_signing_key(jwk_url, kid):
    jwks = requests.get(jwk_url).json()
    for jwk in jwks['keys']:
        if jwk['kid'] == kid:
            return RSAAlgorithm.from_jwk(jwk)
    raise Exception('Public key not found.')

def validate_token(token, audience, issuer, jwk_url):
    headers = jwt.get_unverified_header(token)
    kid = headers['kid']
    signing_key = get_signing_key(jwk_url, kid)

    decoded_token = jwt.decode(
        token,
        signing_key,
        algorithms=["RS256"],
        audience=audience,
        issuer=issuer
    )
    return decoded_token

if __name__ == "__main__":
    parser = argparse.ArgumentParser(description='Validate a JWT token.')
    parser.add_argument('token', type=str, help='The JWT token to validate')
    args = parser.parse_args()

    token = args.token

    # Parse the token's payload to extract audience and issuer
    header, payload, signature = token.split('.')
    decoded_payload = base64url_decode(payload)
    payload_json = json.loads(decoded_payload)

    audience = payload_json['aud']
    issuer = payload_json['iss']
    jwk_url = f"{issuer}.well-known/jwks.json"

    try:
        decoded = validate_token(token, audience, issuer, jwk_url)
        print("Token is valid. Decoded payload:")
        for key, value in decoded.items():
            print(f"{key}: {value}")
    except Exception as e:
        print(f"Token validation failed: {e}")
Install the required packages:
pip install pyjwt requests
Run the script:
python validate_id_token.py ${ID_TOKEN}
You will see an output similar to the following:
Token is valid. Decoded payload:
iss: https://dev-awhjmy38gg5qzx7u.us.auth0.com/
aud: Tg8e5ehkLJ3hdkw1O4D10PwmPy71dvmv
iat: 1716470905
exp: 1716506905
sub: google-oauth2|112744779022331048640
sid: 4W_hQNJJ8ftDL8S3Cozp8GEu2Au4_e9N
From the values in the ID Token, you can conclude:
- The token is issued by Auth0 (
issfield). - The audience of the token is a specific application or API (
audfield), which is the Client ID for Auth0. - The token was issued at 2024-05-23 04:08:25 UTC (
iatfield) and will expire at 2024-05-23 14:08:25 UTC (expfield). - The subject (user) of the token has a unique identifier
google-oauth2|112744779022331048640(subfield). This indicates that the user logged in using Google OAuth2. - The session ID is
4W_hQNJJ8ftDL8S3Cozp8GEu2Au4_e9N(sidfield), used for session management.
Verifying Single Sign-On: Logout
Since our example application does not implement the Auth0 logout logic, we need to explicitly tell Auth0 to logout via an HTTP request. Visit the following URL in your browser:
https://${DOMAIN}/v2/logout?client_id=${CLIENT_ID}
Replace ${DOMAIN} and ${CLIENT_ID} with the configuration items from your Auth0 setup. For detailed instructions on how to log users out using the OIDC endpoint in Auth0, refer to the Auth0 documentation.
After logging out, the page will redirect to the login page again. Upon logging in, the page will redirect to https://www.example.com.
Summary
Through these steps, you can implement OIDC authentication in Envoy Gateway, ensuring API security. This method not only provides a flexible authentication mechanism but also simplifies application identity management. By integrating with identity providers like Auth0, Envoy Gateway can easily achieve Single Sign-On, enhancing user experience and system security. In the future, you can further configure and optimize Envoy Gateway based on your needs, leveraging its powerful authentication and authorization capabilities to meet more complex security requirements and business needs.
References
- Envoy Gateway OIDC Authentication - gateway.envoyproxy.io
- Log Users Out of Auth0 with OIDC Endpoint - auth0.com